Yarna Valley: Difference between revisions
mNo edit summary |
mNo edit summary |
||
| Line 1: | Line 1: | ||
{{Infobox|location | {{Infobox|location | ||
| image = [[File:Yarna-Valley.jpg|400px]] | | image = [[File:Yarna-Valley.jpg|400px]] | ||
| caption = | |||
| game = ''[[The Legend of Zelda: Breath of the Wild|Breath of the Wild]]'' | | game = ''[[The Legend of Zelda: Breath of the Wild|Breath of the Wild]]'' | ||
| inhab | | enemies = | ||
| inhab = | |||
| pointsint = | | pointsint = | ||
| item | | location = [[Gerudo (Breath of the Wild)|Gerudo Province]] | ||
| item = | |||
| natseason = | | natseason = | ||
| related = [[Stalry Plateau]]<br/>[[Spectacle Rock (Breath of the Wild)|Spectacle Rock]]<br/>[[Gerudo Canyon]] | | related = [[Yarna Desert]]<br/>[[Stalry Plateau]]<br/>[[Spectacle Rock (Breath of the Wild)|Spectacle Rock]]<br/>[[Gerudo Canyon]] | ||
}} | }} | ||
'''Yarna Valley''' is a location in ''[[The Legend of Zelda: Breath of the Wild|Breath of the Wild]]''. | '''Yarna Valley''' is a location in ''[[The Legend of Zelda: Breath of the Wild|Breath of the Wild]]''. | ||
== | ==''Breath of the Wild''== | ||
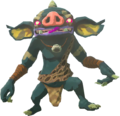
The valley is found just southeast of [[Spectacle Rock (Breath of the Wild)|Spectacle Rock]] and southwest of [[Mount Hylia]] on the [[Great Plateau]]. When traveling on the main road through the [[Gerudo Canyon Pass]], there is an enemy skull base to the southeast. It contains some Red [[Bokoblin]], [[Blue Bokoblin]], and [[Black Bokoblin]]. After defeating all of the enemies, Link can get a treasure chest that contains a [[Knight's Shield]]. Just behind the base is entrance to the valley. | The valley is found just southeast of [[Spectacle Rock (Breath of the Wild)|Spectacle Rock]] and southwest of [[Mount Hylia]] on the [[Great Plateau]]. When traveling on the main road through the [[Gerudo Canyon Pass]], there is an enemy skull base to the southeast. It contains some Red [[Bokoblin]], [[Blue Bokoblin]], and [[Black Bokoblin]]. After defeating all of the enemies, Link can get a treasure chest that contains a [[Knight's Shield]]. Just behind the base is entrance to the valley. | ||
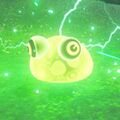
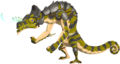
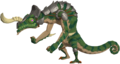
The valley is a steady upward slope leading up to higher elevations of the mountain, near Spectacle Rock. The valley wraps back around and heads northward along the side of Spectacle Rock. A bit further there, there is a more gradual include, making for a great way to initially reach the [[Wasteland Tower]]. The valley has enemies found throughout, with [[Electric Chuchu]] and [[Lizalfos]] being the most common. [[Electric Keese]] and [[Stalmoblin]]s will appear in the evening hours. [[Electric Lizalfos]] will appear at the higher elevations of the valley. | The valley is a steady upward slope leading up to higher elevations of the mountain, near Spectacle Rock. The valley wraps back around and heads northward along the side of Spectacle Rock. A bit further there, there is a more gradual include, making for a great way to initially reach the [[Wasteland Tower]]. The valley has enemies found throughout, with [[Electric Chuchu]] and [[Lizalfos]] being the most common. [[Electric Keese]] and [[Stalmoblin]]s will appear in the evening hours. [[Electric Lizalfos]] will appear at the higher elevations of the valley. | ||
==Enemies== | ===Enemies=== | ||
{{Gallery}} | {{Gallery}} | ||
{{Gallery/Box|file=Red-Bokoblin.png|link=Bokoblin|caption=[[Bokoblin|Red Bokoblin]]}} | {{Gallery/Box|file=Red-Bokoblin.png|link=Bokoblin|caption=[[Bokoblin|Red Bokoblin]]}} | ||
| Line 28: | Line 31: | ||
{{Gallery/Bottom}} | {{Gallery/Bottom}} | ||
==Materials== | ===Materials=== | ||
{{Gallery}} | {{Gallery}} | ||
{{Gallery/Box|file=Cold-darner.png|link=Cold_Darner|caption=[[Cold Darner]]}} | {{Gallery/Box|file=Cold-darner.png|link=Cold_Darner|caption=[[Cold Darner]]}} | ||
| Line 35: | Line 38: | ||
{{Gallery/Bottom}} | {{Gallery/Bottom}} | ||
==Nearby Korok Seeds== | ===Nearby Korok Seeds=== | ||
<section begin=Seed183summary />[[File:Korok183.png|200px|thumb|left|Not counting the rock in the middle, two of these lines have only 8 rocks in them. Put the 2 extra rocks at the east and southwest arms to finish the pattern.]]<section end=Seed183summary />Not counting the rock in the middle, each arm of the pinwheel pattern has 9 rocks, except for two: the southwest and east ones. Fortunately there are also two spare rocks here. Put them at the end of the spokes to complete the pattern.{{Korok Seed|Seed183}}{{Clear|left}} | <section begin=Seed183summary />[[File:Korok183.png|200px|thumb|left|Not counting the rock in the middle, two of these lines have only 8 rocks in them. Put the 2 extra rocks at the east and southwest arms to finish the pattern.]]<section end=Seed183summary />Not counting the rock in the middle, each arm of the pinwheel pattern has 9 rocks, except for two: the southwest and east ones. Fortunately there are also two spare rocks here. Put them at the end of the spokes to complete the pattern.{{Korok Seed|Seed183}}{{Clear|left}} | ||
Revision as of 00:57, October 22, 2021

Games | ||
Location | ||
Related | ||
Yarna Valley is a location in Breath of the Wild.
Breath of the Wild
The valley is found just southeast of Spectacle Rock and southwest of Mount Hylia on the Great Plateau. When traveling on the main road through the Gerudo Canyon Pass, there is an enemy skull base to the southeast. It contains some Red Bokoblin, Blue Bokoblin, and Black Bokoblin. After defeating all of the enemies, Link can get a treasure chest that contains a Knight's Shield. Just behind the base is entrance to the valley.
The valley is a steady upward slope leading up to higher elevations of the mountain, near Spectacle Rock. The valley wraps back around and heads northward along the side of Spectacle Rock. A bit further there, there is a more gradual include, making for a great way to initially reach the Wasteland Tower. The valley has enemies found throughout, with Electric Chuchu and Lizalfos being the most common. Electric Keese and Stalmoblins will appear in the evening hours. Electric Lizalfos will appear at the higher elevations of the valley.
Enemies


Materials


Nearby Korok Seeds

Not counting the rock in the middle, each arm of the pinwheel pattern has 9 rocks, except for two: the southwest and east ones. Fortunately there are also two spare rocks here. Put them at the end of the spokes to complete the pattern.

Solve the Magnesis block puzzle. Match the design by placing a block in the row to the south.