Wallmaster: Difference between revisions
mNo edit summary |
No edit summary |
||
| Line 2: | Line 2: | ||
{{Infobox|enemy | {{Infobox|enemy | ||
| image = [[File:Wallmaster.png|200px]] | | image = [[File:Wallmaster.png|200px]] | ||
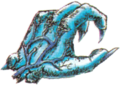
| caption = Wallmaster render from Majora's Mask | | caption = Wallmaster render from ''Majora's Mask'' | ||
| game = ''[[The Legend of Zelda]]''<br/>''[[The Legend of Zelda: A Link to the Past|A Link to the Past]]''<br/>''[[The Legend of Zelda: Ocarina of Time|Ocarina of Time]]''<br/>''[[The Legend of Zelda: Majora's Mask|Majora's Mask]]''<br/>''[[The Legend of Zelda: Oracle of Seasons|Oracle of Seasons]]''<br/>''[[The Legend of Zelda: Oracle of Ages|Oracle of Ages]]''<br/>''[[The Legend of Zelda: The Minish Cap|The Minish Cap]]''<br/>''[[The Legend of Zelda: A Link Between Worlds|A Link Between Worlds]]'' | | game = ''[[The Legend of Zelda]]''<br/>''[[The Legend of Zelda: A Link to the Past|A Link to the Past]]''<br/>''[[The Legend of Zelda: Ocarina of Time|Ocarina of Time]]''<br/>''[[The Legend of Zelda: Majora's Mask|Majora's Mask]]''<br/>''[[The Legend of Zelda: Oracle of Seasons|Oracle of Seasons]]''<br/>''[[The Legend of Zelda: Oracle of Ages|Oracle of Ages]]''<br/>''[[The Legend of Zelda: The Minish Cap|The Minish Cap]]''<br/>''[[The Legend of Zelda: A Link Between Worlds|A Link Between Worlds]]'' | ||
| location = <u>'''''The Legend of Zelda'''''</u><br/><u>'''''A Link to the Past'''''</u><br/>[[Skull Woods (A Link to the Past)|Skull Woods]]<br/>[[Ganon's Tower (A Link to the Past)|Ganon's Tower]]<br/><u>'''''Ocarina of Time'''''</u><br/>[[Forest Temple (Ocarina of Time)|Forest Temple]]<br/>[[Shadow Temple]]<br/><u>'''''Majora's Mask'''''</u><br/>[[Beneath the Well]]<br/><u>'''''Oracle of Seasons'''''</u><br/><u>'''''Oracle of Ages'''''</u><br/><u>'''''A Link Between Worlds'''''</u><br/><u>'''''Wand of Gamelon'''''</u><br/>[[Tykogi Tower]]<br/>[[Dodomai Palace]] | | location = <u>'''''The Legend of Zelda'''''</u><br/><u>'''''A Link to the Past'''''</u><br/>[[Skull Woods (A Link to the Past)|Skull Woods]]<br/>[[Ganon's Tower (A Link to the Past)|Ganon's Tower]]<br/><u>'''''Ocarina of Time'''''</u><br/>[[Forest Temple (Ocarina of Time)|Forest Temple]]<br/>[[Shadow Temple]]<br/><u>'''''Majora's Mask'''''</u><br/>[[Beneath the Well]]<br/><u>'''''Oracle of Seasons'''''</u><br/><u>'''''Oracle of Ages'''''</u><br/><u>'''''A Link Between Worlds'''''</u><br/><u>'''''Wand of Gamelon'''''</u><br/>[[Tykogi Tower]]<br/>[[Dodomai Palace]] | ||
| Line 49: | Line 49: | ||
==Gallery== | ==Gallery== | ||
<gallery> | <gallery> | ||
File:Wallmaster-LoZ-Art.png| | File:Wallmaster-LoZ-Art.png|Wallmaster Artwork from [[The Legend of Zelda Instruction Manual|''The Legend of Zelda'' Instruction Booklet]] | ||
File:Wallmaster-LoZ-Art-2.png| | File:Wallmaster-LoZ-Art-2.png|Wallmaster Artwork from Million Publications Strategy Guide for ''The Legend of Zelda'' | ||
File:WallMaster-Artwork-LoZ-Kodokawa-Shoten-Guide.png| | File:WallMaster-Artwork-LoZ-Kodokawa-Shoten-Guide.png|Wallmaster Artwork from Kadokawa Shoten Strategy Guide for ''The Legend of Zelda'' | ||
File:Wallmaster-LoZ-Sprite.png| | File:Wallmaster-LoZ-Sprite.png|Wallmaster Sprite from ''The Legend of Zelda'' | ||
File:Wallmaster-1.png| | File:Wallmaster-1.png|Wallmaster Sprite from ''A Link to the Past'' | ||
File:Wallmaster-3.png| | File:Wallmaster-3.png|Wallmaster Sprite from ''A Link to the Past'' | ||
File:Wallmaster-4.png| | File:Wallmaster-4.png|Wallmaster Sprite from ''A Link to the Past'' | ||
File:Wallmaster-Ocarina.png|'' | File:Wallmaster-Ocarina.png|Wallmaster from ''Ocarina of Time'' | ||
File:Wallmaster-Oracle-Sprite.png| | File:Wallmaster-Oracle-Sprite.png|Wallmaster Sprite from ''Oracle of Seasons'' and ''Oracle of Ages'' | ||
File:FSA-Wallmaster.png| | File:FSA-Wallmaster.png|Wallmaster Sprite from ''Four Swords Adventures'' | ||
File:Wallmaster (The Minish Cap).gif| | File:Wallmaster (The Minish Cap).gif|Wallmaster Sprite from ''The Minish Cap'' | ||
File:Wallmaster-CDi.png| | File:Wallmaster-CDi.png|Wallmaster Sprite from ''The Faces of Evil'' and ''The Wand of Gamelon'' | ||
</gallery> | </gallery> | ||
| Line 76: | Line 76: | ||
{{Listbox|A Link Between Worlds Enemies}} | {{Listbox|A Link Between Worlds Enemies}} | ||
{{Cat|Iconic Enemies}} | |||
{{Cat|The Legend of Zelda Enemies}} | {{Cat|The Legend of Zelda Enemies}} | ||
{{Cat|A Link to the Past Enemies}} | {{Cat|A Link to the Past Enemies}} | ||
| Line 86: | Line 87: | ||
{{Cat|The Wand of Gamelon Enemies}} | {{Cat|The Wand of Gamelon Enemies}} | ||
{{Cat|BS The Legend of Zelda Enemies}} | {{Cat|BS The Legend of Zelda Enemies}} | ||
Revision as of 08:42, September 14, 2021
| This article is a stub. You can help the Zelda Dungeon Wiki by expanding it. |

Wallmaster render from Majora's Mask
Games | ||
Location | The Legend of Zelda | |
Attacks | Ocarina of Time | |
Effective | ||
Related | ||
Wallmasters are recurring enemies in The Legend of Zelda series. They are similar to Floormasters in appearance.
Appearances
The Legend of Zelda
Wallmasters debut in The Legend of Zelda, where they are frequently found in dungeons, and will come through the wall attempting to grab Link. This will result in Link starting from the entrance of the dungeon.
A Link to the Past

Wallmasters first appear within Skull Woods, the third dungeon of the Dark World. Unlike their appearance from The Legend of Zelda, Wallmasters come from the ceiling instead of the wall. Initially, they appear hidden as if they are not in the room. However, a shadow will appear and a noise can be heard as the Wallmaster drops from the ceiling. The Wallmaster will attempt to drop down and grab Link. If it successfully does so, it will take Link back to the entrance of the dungeon. In Skull Woods, since there are multiple dungeon entrances, it will take Link back to where he last entered the dungeon.
A Wallmaster can be defeated with two strikes from Link's Master Sword. However, even if one is defeated, new Wallmasters will continuously drop from the ceiling. Since there is an endless amount of Wallmasters in any particular room they appear, there is little reason to defeat them. Instead, Link is better off just avoiding them when they fall from the ceiling.
Ocarina of Time

|
Wallmaster |
|---|
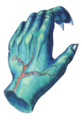
In Ocarina of Time, Wallmasters once again hang from the ceiling and drop down on Link. A shadow and an ominous noise will signal their approach, as well as a brief comment from Navi upon entering the room that suggests that Link watch out for the monsters. They are first encountered in the Forest Temple and later appear in the Shadow Temple, Spirit Temple and Ganon's Castle.
Majora's Mask
It's a Wallmaster! Keep an eye |
Wallmasters appear in dark places, such as Beneath the Well, and act just as they do in Ocarina of Time.
Oracle of Seasons and Oracle of Ages
| This section is a stub. You can help the Zelda Dungeon Wiki by expanding it. |
The Minish Cap
Wallmasters behave very similarly to other titles in The Minish Cap. They first appear in the Fortress of Winds and Link can see where they will drop down by looking at their shadow. If they grab Link, he will be transported back to the beginning of the dungeon. If defeated, they disappear permanently.
A Link Between Worlds
Wallmasters behave in a similar manner to that of A Link to the Past in that they come down from the ceiling, grab Link and take him back to the beginning of the dungeon. In this game, Wallmasters are used to activate switches on an unreachable platform above Link, allowing Link to progress. Wallmasters in this game can be found in Skull Woods and Lorule Castle.
Non-Canon Appearances
| This article describes a subject that is or may be outside the core Zelda canon. |
Link: The Faces of Evil
Wallmasters can be found in Harlequin Bazaar and Fortress Centrum. They appear in the background through small holes. They will reach their hand out of the hole in the wall and try to hit Link. They cannot be defeated and should be avoided whenever possible. Using Ropes to climb to higher ledges is the best way to stay away from these creatures.
Zelda: The Wand of Gamelon
In this game, Wallmasters appear in Tykogi Tower and Dodomai Palace. They look like and act the same as in Link: The Faces of Evil.
Gallery
Wallmaster Artwork from The Legend of Zelda Instruction Booklet

Wallmaster Artwork from Million Publications Strategy Guide for The Legend of Zelda
Wallmaster Artwork from Kadokawa Shoten Strategy Guide for The Legend of Zelda

Wallmaster Sprite from The Legend of Zelda

Wallmaster Sprite from A Link to the Past

Wallmaster Sprite from A Link to the Past

Wallmaster Sprite from A Link to the Past
Wallmaster from Ocarina of Time

Wallmaster Sprite from Oracle of Seasons and Oracle of Ages

Wallmaster Sprite from Four Swords Adventures

Wallmaster Sprite from The Minish Cap

Wallmaster Sprite from The Faces of Evil and The Wand of Gamelon


.gif)
