Urbosa, the Gerudo Chief: Difference between revisions
m (→Trivia) |
(fix up chests and koroks sections) |
||
| Line 49: | Line 49: | ||
*Capture the Outposts (3) | *Capture the Outposts (3) | ||
*Defeat Master Kohga | *Defeat Master Kohga | ||
==Cutscenes== | |||
===Urbosa, the Gerudo Chief [text]=== | |||
{{quote|The Gerudo lived in a settlement in the [[Gerudo Desert (Breath of the Wild)|Gerudo Desert]]. Comprised entirely of women, they were a tribe of great might and nobility.|In-game Gallery description}} | |||
===Attack of the Gerudo!=== | |||
{{quote|The party sets out for Gerudo Town to recruit their chief, Urbosa, as a pilot of a Divine Beast. However, they are unexpectedly attacked by the Gerudo. Zelda steels herself and attempts to learn Urbosa's true motives.|In-game Gallery description}} | |||
===Return of the Chief=== | |||
{{quote|With Zelda in peril, the real Urbosa makes her appearance, and the impostor chief is revealed to be Master Kohga of the Yiga Clan. Kohga quickly summons reinforcements to the battle then abruptly leaves them to fight on their own.|In-game Gallery description}} | |||
===Slippery as a Banana Peel!=== | |||
{{quote|Urbosa and the others manage to corner Master Kohga, but they're suddenly confronted by the Yiga Blademaster Sooga. Both Sooga and Kohga disappear, though the conflict with the Yiga Clan appears likely to continue.|In-game Gallery description}} | |||
===Urbosa's Wishes=== | |||
{{quote|In other to protect both her own desert home and all of Hyrule, Urbosa agrees to become a pilot for a Divine Beast. She also offers words of comfort to Zelda, who is feeling a mounting pressure to fulfill<!--[sic]--> her duty as the days pass.|In-game Gallery description}} | |||
===Plans for the Future=== | |||
{{quote|Master Kohga and Sooga escape to their hideout. Waiting for them there is the mysterious seer [[Astor]], as well as a black Guardian eerily similar to the model that has been accompanying Zelda.|In-game Gallery description}} | |||
==Treasure Chests== | ==Treasure Chests== | ||
{{See also|Age of Calamity Treasure Chests}} | |||
<section begin=treasure /> | |||
{{TODO|What and where is chest #8?}} | {{TODO|What and where is chest #8?}} | ||
{{TODO|Screenshots and better descriptions}} | {{TODO|Screenshots and better descriptions}} | ||
| Line 60: | Line 81: | ||
* [[Soldier's Broadsword]] - Up the stairs after encountering Urbosa. | * [[Soldier's Broadsword]] - Up the stairs after encountering Urbosa. | ||
* [[Traveler's Sword]] - In the northwest corner of the map. | * [[Traveler's Sword]] - In the northwest corner of the map. | ||
* ? | * ? | ||
* [[Kakariko Kodachi]] - Use [[Magnesis]] on the chest just south of [[Master Kohga]]'s outpost. | * [[Kakariko Kodachi]] - Use [[Magnesis]] on the chest just south of [[Master Kohga]]'s outpost. | ||
* [[Ancient Memory Part]] - Along the northwest wall of Gerudo Town, up stairs and inside a room. | * [[Ancient Memory Part]] - Along the northwest wall of Gerudo Town, up stairs and inside a room. | ||
<section end=treasure /> | |||
<section end= | |||
==Koroks== | ==Koroks== | ||
| Line 97: | Line 98: | ||
File:Urbosa-the-Gerudo-Chief-06.jpg|<center>At the northwest entrance to Gerudo Town, there is a pinwheel found in the sandy courtyard.</center> | File:Urbosa-the-Gerudo-Chief-06.jpg|<center>At the northwest entrance to Gerudo Town, there is a pinwheel found in the sandy courtyard.</center> | ||
File:Urbosa-the-Gerudo-Chief-07.jpg|<center>At the far west end of the desert, just northwest of Gerudo Town. Examine the sparkling light.</center> | File:Urbosa-the-Gerudo-Chief-07.jpg|<center>At the far west end of the desert, just northwest of Gerudo Town. Examine the sparkling light.</center> | ||
File:Urbosa-the-Gerudo-Chief-03.jpg|<center>Break the crate at the far southwest end of the map, just south of Gerudo Town.</center><!-- Set A --> | File:Urbosa-the-Gerudo-Chief-03.jpg|<center>Break the crate at the far southwest end of the map, just south of Gerudo Town.</center> <!-- Set A --> | ||
File:Urbosa-the-Gerudo-Chief-04.jpg|<center>After encountering [[Urbosa]], climb up the stairs and examine the glowing light.</center><!-- Set A --> | File:Urbosa-the-Gerudo-Chief-04.jpg|<center>After encountering [[Urbosa]], climb up the stairs and examine the glowing light.</center> <!-- Set A --> | ||
File:Urbosa-the-Gerudo-Chief-05.jpg|<center>There is a pinwheel at the northernmost portion of Gerudo Town, near some rubble.</center> | File:Urbosa-the-Gerudo-Chief-05.jpg|<center>There is a pinwheel at the northernmost portion of Gerudo Town, near some rubble.</center> | ||
File:Urbosa-the-Gerudo-Chief-08.jpg|<center>After encountering the [[Molduga]], head southeast towards the center of the map. Use [[Stasis]] and then shoot the balloon.</center> | File:Urbosa-the-Gerudo-Chief-08.jpg|<center>After encountering the [[Molduga]], head southeast towards the center of the map. Use [[Stasis]] and then shoot the balloon.</center> | ||
File:Urbosa-the-Gerudo-Chief-09.jpg|<center>At the northeast part of the map, just east of the outpost where [[Master Kohga]] is fought. Examine the pinwheel between the cannons.</center> | File:Urbosa-the-Gerudo-Chief-09.jpg|<center>At the northeast part of the map, just east of the outpost where [[Master Kohga]] is fought. Examine the pinwheel between the cannons.</center> | ||
File:Urbosa-the-Gerudo-Chief-01.jpg|<center>At the southeast portion of the map, | File:Urbosa-the-Gerudo-Chief-01.jpg|<center>At the southeast portion of the map, blow up the boulder with a [[Remote Bomb]].</center> | ||
</gallery> | </gallery> | ||
<section end=koroks /> | <section end=koroks /> | ||
==Trivia== | ==Trivia== | ||
Revision as of 23:29, December 1, 2020
- This article is about the story scenario from Age of Calamity. For the character which it is named after, see Urbosa.
| Spoiler Alert! This article describes a subject that is sensitive to plot development. |
| This article is a stub. You can help the Zelda Dungeon Wiki by expanding it. |

Number | Chapter 2-4 | |
Games | ||
Stage | ||
Previous | ||
Simultaneous | ||
Boss | Master Kohga | |
Mini-bosses | ||
Enemies | ||
Key Characters | ||
Battlefield-Specific Materials | ||
Rewards | Desert Voe Spaulder, Amber (1), Palm Fruit (5), Hydromelon (5), Noble Pursuit recipe | |
Warriors | ||
Recommended Level | Lv. 5 | |
"Zelda, along with the rest of the party, sets out for Gerudo Town to ask Urbosa to become a pilot. Along the way, they suddenly come under attack by the Gerudo."
Urbosa, the Gerudo Chief is the fourth listed scenario of Age of Calamity Chapter 2, although the four main Chapter 2 scenarios can be completed in any order.
- Victory Condition: Approach Urbosa → Defeat Master Kohga
- Defeat Condition: Link, Zelda, or Impa flees → Link, Zelda, Urbosa, or Impa flees
Objectives
- Head to Urbosa
- Approach the town from the south
- Head to Urbosa
- Defeat the Yiga Blademasters (3)
- Head for the targeted position
- Defeat the enemies with a loud attack
- Defeat the Yiga Clan with Remote Bombs
- Capture the Outposts (3)
- Defeat Master Kohga
Cutscenes
Urbosa, the Gerudo Chief [text]
"The Gerudo lived in a settlement in the Gerudo Desert. Comprised entirely of women, they were a tribe of great might and nobility."
Attack of the Gerudo!
"The party sets out for Gerudo Town to recruit their chief, Urbosa, as a pilot of a Divine Beast. However, they are unexpectedly attacked by the Gerudo. Zelda steels herself and attempts to learn Urbosa's true motives."
Return of the Chief
"With Zelda in peril, the real Urbosa makes her appearance, and the impostor chief is revealed to be Master Kohga of the Yiga Clan. Kohga quickly summons reinforcements to the battle then abruptly leaves them to fight on their own."
Slippery as a Banana Peel!
"Urbosa and the others manage to corner Master Kohga, but they're suddenly confronted by the Yiga Blademaster Sooga. Both Sooga and Kohga disappear, though the conflict with the Yiga Clan appears likely to continue."
Urbosa's Wishes
"In other to protect both her own desert home and all of Hyrule, Urbosa agrees to become a pilot for a Divine Beast. She also offers words of comfort to Zelda, who is feeling a mounting pressure to fulfill her duty as the days pass."
Plans for the Future
"Master Kohga and Sooga escape to their hideout. Waiting for them there is the mysterious seer Astor, as well as a black Guardian eerily similar to the model that has been accompanying Zelda."
Treasure Chests
- See also: Age of Calamity Treasure Chests
- 100 Rupees - Inside a room just inside Gerudo Town's south entrance.
- 300 Rupees - Northeast corner of the map, Wooden Chest.
- 5 Ruby - Beneath a large rock north of the Molduga.
- 5 Opal - Amongst the tents at Kara Kara Bazaar toward the Northeast.
- Soldier's Broadsword - Just outside the southeast corner to the south.
- Soldier's Broadsword - Up the stairs after encountering Urbosa.
- Traveler's Sword - In the northwest corner of the map.
- ?
- Kakariko Kodachi - Use Magnesis on the chest just south of Master Kohga's outpost.
- Ancient Memory Part - Along the northwest wall of Gerudo Town, up stairs and inside a room.
Koroks
- See also: Age of Calamity Koroks
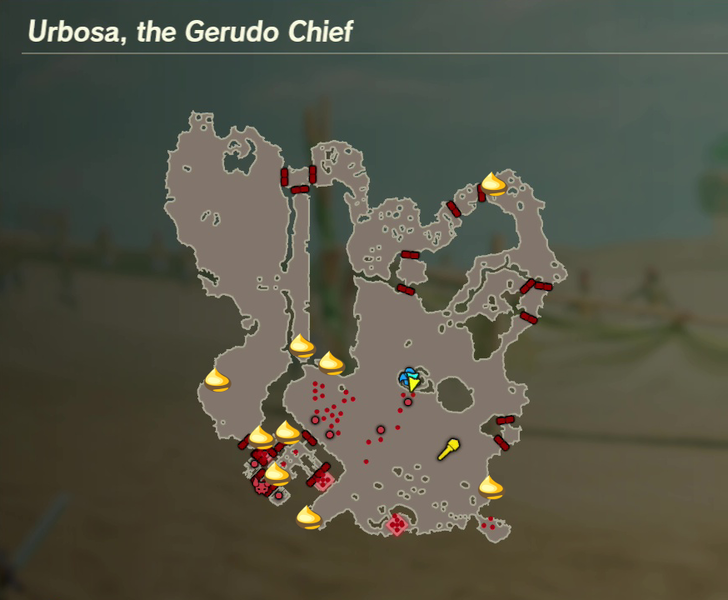
There are 9 Koroks found in Urbosa, the Gerudo Chief.

Found west of the starting location, near the center-left part of the map. Examine the yellow flower that is a bit northeast of Gerudo Town. 
At the northwest entrance to Gerudo Town, there is a pinwheel found in the sandy courtyard. 
At the far west end of the desert, just northwest of Gerudo Town. Examine the sparkling light. 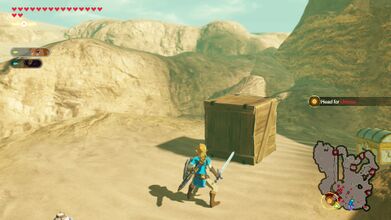
Break the crate at the far southwest end of the map, just south of Gerudo Town. 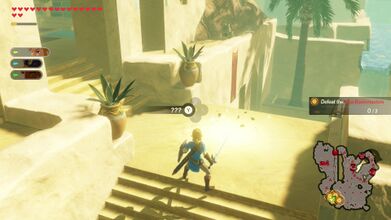
After encountering Urbosa, climb up the stairs and examine the glowing light. 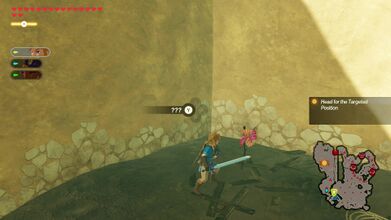
There is a pinwheel at the northernmost portion of Gerudo Town, near some rubble. 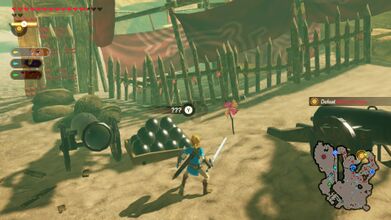
At the northeast part of the map, just east of the outpost where Master Kohga is fought. Examine the pinwheel between the cannons. 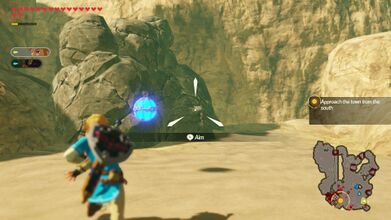
At the southeast portion of the map, blow up the boulder with a Remote Bomb.


Trivia
- Although it is possible to defeat the Molduga, it is not required. Indeed, Urbosa will say to "Let the Molduga be. Focus on the Yiga Clan." and an objective-style message pops up saying "Avoid fighting with the Molduga." If you ignore this and defeat it regardless, Urbosa will say "You defeated the Molduga? No easy feat." It will also drop five Molduga Fins, useful for quests such as To the Zora Voe and Vai.