Tah Muhl Shrine: Difference between revisions
No edit summary |
mNo edit summary |
||
| (10 intermediate revisions by 6 users not shown) | |||
| Line 1: | Line 1: | ||
{{Infobox|location | {{Infobox|location | ||
| image = [[File:TahMuhlShrine.jpg | | image = [[File:TahMuhlShrine.jpg]] | ||
| caption = | |||
| game = ''[[The Legend of Zelda: Breath of the Wild|Breath of the Wild]]'' | | game = ''[[The Legend of Zelda: Breath of the Wild|Breath of the Wild]]'' | ||
| inhab = [[Tah Muhl]] | | inhab = [[Tah Muhl]] | ||
| pointsint = | | pointsint = | ||
| item = [[Spirit Orb]] | | item = [[Spirit Orb]]<br/>[[Opal]]<br/>[[Cobble Crusher]]<br/>[[Ruby]] | ||
| natseason = | | natseason = | ||
| related = | | related = | ||
| walkthrough = [https://www.youtube.com/watch?v=X8IuzOTCwNY Video Walkthrough] | | walkthrough = [https://www.youtube.com/watch?v=X8IuzOTCwNY Video Walkthrough] | ||
}}<section begin=summary /><includeonly> | }}<section begin=summary /><includeonly> | ||
''Passing the Flame''<br><br> | |||
'''Requirements:''' None<br> | '''Requirements:''' None<br> | ||
'''Shrine Quest:''' {{MapLink|A Landscape of a Stable}} | '''Shrine Quest:''' {{MapLink|A Landscape of a Stable}} | ||
| Line 24: | Line 24: | ||
{{MapLink|Tah Muhl Shrine}}<br><br> | {{MapLink|Tah Muhl Shrine}}<br><br> | ||
'''Requirements:''' None | '''Requirements:''' None | ||
</includeonly><section end=A Landscape of a Stable /> | </includeonly><section end=A Landscape of a Stable />{{main|A Landscape of a Stable}} | ||
Speak with Mayro to | Speak with [[Mayro]] at the [[Foothill Stable]] to begin the quest. Mayro is staring at a painting with [[Death Mountain (Breath of the Wild)|Death Mountain]] and the Foothill Stable shown in the background. A shrine can be seen at the far left of the painting and if Link goes to this location, he will find the Tah Muhl Shrine. Activating the pedestal will complete the shrine quest. | ||
==Passing the Flame== | |||
Straight ahead there is some ivy growing on a wall. To the right there are some lit torches. Link can use a burnable weapon to light it on fire and then light the ivy. This will cause it to burn down, also burning the wooden crates behind it, revealing a path. Alternatively, Link can use bombs to blow up the opening. | |||
In the next room, turn to the left to find a locked door. There are some vines near the door and Link can light them on fire. This will cause the wooden platform above, along with the treasure chest to burn up. A [[Small Key]] will drop down to the floor. Link can use [[Magnesis]] to grab it and pull it over the gate. Then Link can use it on the locked door to reach a treasure chest that contains a [[Ruby]]. | |||
There are two more optional treasure chests in this room. One is easily visible on top of three wooden crates. Link can burn down the crates or break them with bombs. The treasure chest contains an [[Opal]] gem. The second treasure is to the right of the altar, on the lower floor. Burn the ivy to discover the treasure chest, which contains either a [[Cobble Crusher]] or [[Stone Smasher]]. | |||
In order to reach the altar, burn or blowup the crates that are holding the ramp up. Then climb the ramp and speak with [[Tah Muhl]] to get the [[Spirit Orb]]. | |||
Use the | ==Gallery== | ||
<gallery widths="400px" heights="220px"> | |||
File:Tah-Muhl-Shrine-01.jpg|<center>Use the torch to carry a flame.</center> | |||
File:Tah-Muhl-Shrine-02.jpg|<center>Burn the vines that are on the wall.</center> | |||
File:Tah-Muhl-Shrine-03.jpg|<center>This will reveal a passage.</center> | |||
File:Tah-Muhl-Shrine-04.jpg|<center>Burn the vines on the side of the locked door.</center> | |||
File:Tah-Muhl-Shrine-05.jpg|<center>This will also burn the treasure chest on the other side.</center> | |||
File:Tah-Muhl-Shrine-06.jpg|<center>Grab the [[Small Key]] that fell out with [[Magnesis]].</center> | |||
File:Tah-Muhl-Shrine-07.jpg|<center>Open the locked door to reach a chest with a [[Ruby]].</center> | |||
File:Tah-Muhl-Shrine-08.jpg|<center>Burn the stack of wooden crates to get an [[Opal]].</center> | |||
File:Tah-Muhl-Shrine-09.jpg|<center>Burn the vines that are to the right of the altar.</center> | |||
File:Tah-Muhl-Shrine-10.jpg|<center>A chest is tucked away which contains a powerful weapon.</center> | |||
File:Tah-Muhl-Shrine-11.jpg|<center>Burn the crates that are holding up the ramp.</center> | |||
File:Tah-Muhl-Shrine-12.jpg|<center>Run up the ramp to reach the altar.</center> | |||
</gallery> | |||
{{Listbox|Breath of the Wild Shrines|hide=hide}} | |||
{{Cat|Breath of the Wild Shrines}} | {{Cat|Breath of the Wild Shrines}} | ||
Revision as of 19:02, November 3, 2020

Games | ||
Inhabitants | ||
Items | ||
| Guides | ||
|---|---|---|
Walkthrough | ||
Tah Muhl Shrine is one of the many Shrine of Trials from Breath of the Wild.
Requirements
Shrine Quest: A Landscape of a Stable
- Main article: A Landscape of a Stable
Speak with Mayro at the Foothill Stable to begin the quest. Mayro is staring at a painting with Death Mountain and the Foothill Stable shown in the background. A shrine can be seen at the far left of the painting and if Link goes to this location, he will find the Tah Muhl Shrine. Activating the pedestal will complete the shrine quest.
Passing the Flame
Straight ahead there is some ivy growing on a wall. To the right there are some lit torches. Link can use a burnable weapon to light it on fire and then light the ivy. This will cause it to burn down, also burning the wooden crates behind it, revealing a path. Alternatively, Link can use bombs to blow up the opening.
In the next room, turn to the left to find a locked door. There are some vines near the door and Link can light them on fire. This will cause the wooden platform above, along with the treasure chest to burn up. A Small Key will drop down to the floor. Link can use Magnesis to grab it and pull it over the gate. Then Link can use it on the locked door to reach a treasure chest that contains a Ruby.
There are two more optional treasure chests in this room. One is easily visible on top of three wooden crates. Link can burn down the crates or break them with bombs. The treasure chest contains an Opal gem. The second treasure is to the right of the altar, on the lower floor. Burn the ivy to discover the treasure chest, which contains either a Cobble Crusher or Stone Smasher.
In order to reach the altar, burn or blowup the crates that are holding the ramp up. Then climb the ramp and speak with Tah Muhl to get the Spirit Orb.
Gallery
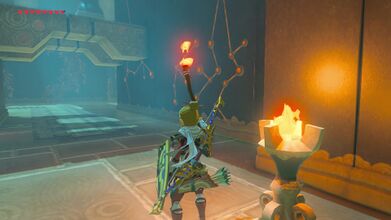
Use the torch to carry a flame. 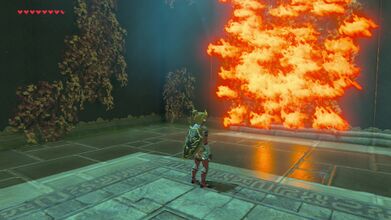
Burn the vines that are on the wall. 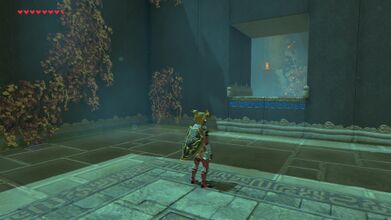
This will reveal a passage. 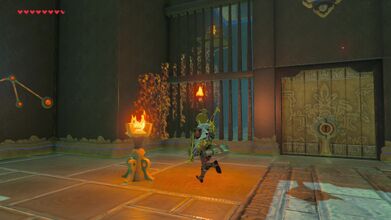
Burn the vines on the side of the locked door. 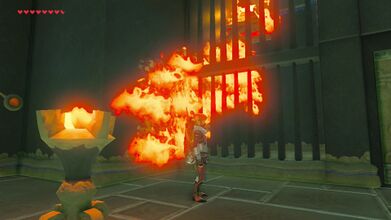
This will also burn the treasure chest on the other side. 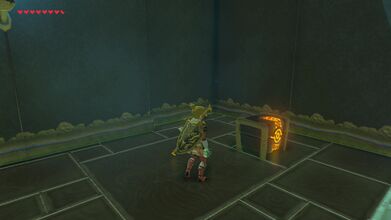
Open the locked door to reach a chest with a Ruby. 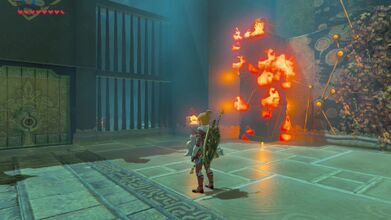
Burn the stack of wooden crates to get an Opal. 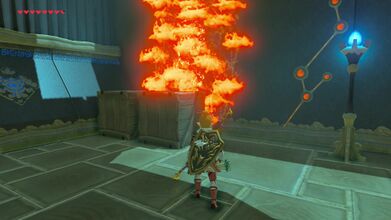
Burn the vines that are to the right of the altar. 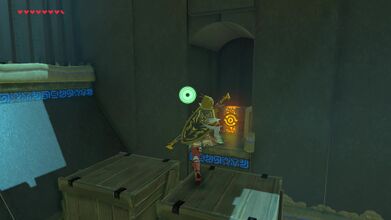
A chest is tucked away which contains a powerful weapon. 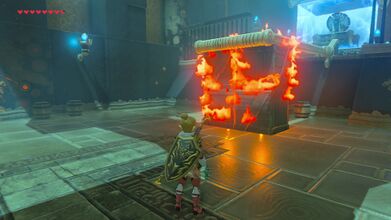
Burn the crates that are holding up the ramp. 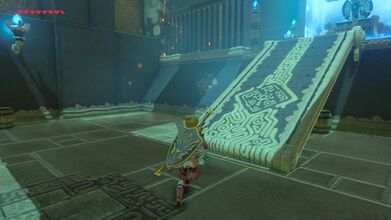
Run up the ramp to reach the altar.


