Stone Tower Temple: Difference between revisions
mNo edit summary |
mNo edit summary |
||
| Line 1: | Line 1: | ||
{{Stub}} | {{Stub}} | ||
{{Infobox|dungeon | {{Infobox|dungeon | ||
| image = [[File:Stone Tower Temple.png| | | image = [[File:Stone Tower Temple.png|400px]] | ||
| caption = | | caption = | ||
| game = ''[[The Legend of Zelda: Majora's Mask|Majora's Mask]]'' | | game = ''[[The Legend of Zelda: Majora's Mask|Majora's Mask]]'' (''[[The Legend of Zelda: Majora's Mask 3D|3D]]'') | ||
| location = [[Stone Tower]] | | location = [[Stone Tower]], [[Ikana]] | ||
| quest = [[Great Fairy of the Canyon]] | |||
| boss = [[Twinmold|Giant Masked Insect: Twinmold]] | | boss = [[Twinmold|Giant Masked Insect: Twinmold]] | ||
| miniboss = [[Wizzrobe]]<br/>[[Garo Master]]<br/>[[Gomess]] | | miniboss = [[Wizzrobe]]<br/>[[Garo Master]]<br/>[[Gomess]] | ||
| enemies = {{Hide|[[Armos Statue]]<br/>[[Beamos]]<br/>[[Black Boe]]<br/>[[Blue Bubble]]<br/>[[Bombchu]]<br/>[[Death Armos]]<br/>[[Dexihand]]<br/>[[Eyegore]]<br/>[[Flying Jar]]<br/>[[Green ChuChu]]<br/>[[Hiploop]]<br/>[[Nejiron]]<br/>[[Poe]]<br/>[[Real Bombchu]]<br/>[[Spike]]<br/>[[Yellow ChuChu]]}} | | enemies = {{Hide|[[Armos Statue]]<br/>[[Beamos]]<br/>[[Black Boe]]<br/>[[Blue Bubble]]<br/>[[Bombchu]]<br/>[[Death Armos]]<br/>[[Dexihand]]<br/>[[Eyegore]]<br/>[[Flying Jar]]<br/>[[Green ChuChu]]<br/>[[Hiploop]]<br/>[[Nejiron]]<br/>[[Poe]]<br/>[[Real Bombchu]]<br/>[[Spike]]<br/>[[Yellow ChuChu]]}} | ||
| item = [[Light Arrow]]<br/>[[Giant's Mask]] | | inhab = | ||
| | | item = [[Light Arrow]]<br/>[[Giant's Mask]]<br/>[[Stray Fairy|Stray Fairies]] [[Majora's Mask Stray Fairies|×15]] | ||
| prereq = [[Elegy of Emptiness]] | |||
| reward = [[Twinmold's Remains]]<br/>[[Heart Container]] | | reward = [[Twinmold's Remains]]<br/>[[Heart Container]] | ||
| walkthrough = [https://www.zeldadungeon.net/majoras-mask-walkthrough/stone-tower-temple/ Text Walkthrough] | | related = | ||
| walkthrough = [https://www.zeldadungeon.net/majoras-mask-walkthrough/stone-tower-temple/ Text Walkthrough] | |||
[https://www.youtube.com/watch?v=ojWNcvk6kdo Video Walkthrough (Right-Side Up)] | [https://www.youtube.com/watch?v=ojWNcvk6kdo Video Walkthrough (Right-Side Up)] | ||
[https://www.youtube.com/watch?v=A6qJsXFlFxU Video Walkthrough (Light Arrows)] | [https://www.youtube.com/watch?v=A6qJsXFlFxU Video Walkthrough (Light Arrows)] | ||
Revision as of 03:36, March 28, 2023
| This article is a stub. You can help the Zelda Dungeon Wiki by expanding it. |
Games | ||
Location | ||
Quests | ||
Boss | ||
Mini-bosses | ||
Enemies | ||
Items | ||
Prerequisite | ||
Rewards | ||
| Guides | ||
|---|---|---|
Walkthrough | ||

|
In-depth guide:
Majora's Mask Walkthrough Chapter 12: Stone Tower Temple |
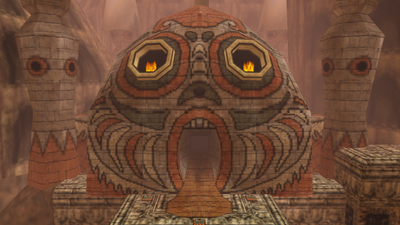
The Stone Tower Temple is the fourth dungeon in Majora's Mask. It features several challenging new puzzles and harder versions of older ones. It has the unique mechanic of flipping the temple upside down to progress. Once Link defeats the mini-boss, the Garo Master, he must go back to the entrance to the temple and flip the entire temple over. Once he has done this, he revisits many of the locations he had been to previously, but they are upside down. This dungeon is located in the Ikana Canyon region in the east of Termina. Link must first climb up Stone Tower to reach the entrance to the dungeon.
Boss
- Main article: Twinmold
Subtitled "Giant Masked Insect", Twinmold is a pair of giant, flying, serpentine invertebrates closely resembling Moldorms or Molgera from The Wind Waker. The duo float around the desert and stone ruins. They can be defeated by wearing the Giant's Mask and slashing at their heads or tails, or by shooting their heads with Light Arrows.


