Stalblind: Difference between revisions
No edit summary |
(Added more info about the boss and the strategy) |
||
| Line 1: | Line 1: | ||
{{Infobox|boss | {{Infobox|boss | ||
| image = [[File:Stalblind-3.png]] | | image = [[File:Stalblind-3.png]] | ||
| caption = | | caption = | ||
| Line 12: | Line 7: | ||
| dungeon = [[Thieves' Hideout]] | | dungeon = [[Thieves' Hideout]] | ||
| weapon = [[Sword]] | | weapon = [[Sword]] | ||
| reward = [[Heart Container]]<br>[[Osfala]] | | reward = [[Heart Container]]<br>Portrait of [[Osfala]] | ||
}} | }} | ||
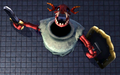
'''Stalblind''' is the [[boss]] encountered in the [[Thieves' Hideout]] in ''[[The Legend of Zelda: A Link Between Worlds|A Link Between Worlds]]''. He is the boss of thieves in [[Lorule]] who has hid the portrait of [[Osfala]] in a building next to the Thieves' Hideout on the outskirts of [[Thieves' Town]]. After the [[Thief Girl]] found out where he hid the portrait, Stalblind locked her up in his hideout and threw away the key. | |||
==Strategy== | |||
Once [[Link]] enters the boss room, he is separated from the Thief Girl. They are then laughed at and asked if they actually thought he would let her escape with Link. Afterwards, Stalblind appears in the middle of the room, swinging his sword and begins the fight. At the beginning, he cannot be hurt but guards himself with a large sword and shield in which Link can [[merge]] onto. Stalblind will become confused and leaves his guard down, allowing Link to hurt him with the [[Master Sword]]. After a few hits, he becomes murky and moves into a corner where he spews out black smog at Link. At this point, Stalblind uses his sword to attack him. After swinging his sword, he becomes vulnerable and will use his shield to guard if Link attacks him, allowing him to merge with it and deal more damage to the boss. Sustaining more hits from Link's sword, Stalblind tosses his shield into the pit surrounding the boss room and begins to use more sword techniques against Link such as [[Spin Attack]]s and vertical slashes, becoming vulnerable for the rest of the phase. | |||
Once Stalblind begins to flash red after being dealt with more damage, he removes his head from his body and start spinning across the room, spewing out black smog similarly to his previous phases, while the body roams around the room and will randomly swing its sword around. While the head is invulnerable, Link can still damage him by slashing at the body while avoiding the attacks from Stalblind's head and body. Once Link has defeated Stalblind, he is reunited with the Thief Girl, and another exit to the Thieves' Hideout opens. Exiting the dungeon, she leads Link to where Stalblind hid the portrait of Osfala in which a [[Heart Container]] can be found nearby. | |||
==Gallery== | ==Gallery== | ||
<gallery> | <gallery> | ||
File:Stalblind-1.png | File:Stalblind-1.png|''Stalblind appearing'' | ||
File:Stalblind-2.png | File:Stalblind-2.png|''Stalblind swinging his sword'' | ||
File:Stalblind-4.png | File:Stalblind-4.png| | ||
</gallery> | </gallery> | ||
{{Cat|A Link Between Worlds Bosses}} | {{Cat|A Link Between Worlds Bosses}} | ||
Revision as of 21:22, December 7, 2013

Games | ||
Dungeons | ||
Rewards | Heart Container | |
Effective | ||
Stalblind is the boss encountered in the Thieves' Hideout in A Link Between Worlds. He is the boss of thieves in Lorule who has hid the portrait of Osfala in a building next to the Thieves' Hideout on the outskirts of Thieves' Town. After the Thief Girl found out where he hid the portrait, Stalblind locked her up in his hideout and threw away the key.
Strategy
Once Link enters the boss room, he is separated from the Thief Girl. They are then laughed at and asked if they actually thought he would let her escape with Link. Afterwards, Stalblind appears in the middle of the room, swinging his sword and begins the fight. At the beginning, he cannot be hurt but guards himself with a large sword and shield in which Link can merge onto. Stalblind will become confused and leaves his guard down, allowing Link to hurt him with the Master Sword. After a few hits, he becomes murky and moves into a corner where he spews out black smog at Link. At this point, Stalblind uses his sword to attack him. After swinging his sword, he becomes vulnerable and will use his shield to guard if Link attacks him, allowing him to merge with it and deal more damage to the boss. Sustaining more hits from Link's sword, Stalblind tosses his shield into the pit surrounding the boss room and begins to use more sword techniques against Link such as Spin Attacks and vertical slashes, becoming vulnerable for the rest of the phase.
Once Stalblind begins to flash red after being dealt with more damage, he removes his head from his body and start spinning across the room, spewing out black smog similarly to his previous phases, while the body roams around the room and will randomly swing its sword around. While the head is invulnerable, Link can still damage him by slashing at the body while avoiding the attacks from Stalblind's head and body. Once Link has defeated Stalblind, he is reunited with the Thief Girl, and another exit to the Thieves' Hideout opens. Exiting the dungeon, she leads Link to where Stalblind hid the portrait of Osfala in which a Heart Container can be found nearby.
Gallery
Stalblind appearing
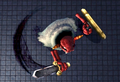
Stalblind swinging his sword


