Sheh Rata Shrine: Difference between revisions
mNo edit summary |
No edit summary |
||
| Line 20: | Line 20: | ||
==Requirements== | ==Requirements== | ||
{{Shrine}}{{Clear|left}} | {{Shrine}}{{Clear|left}} | ||
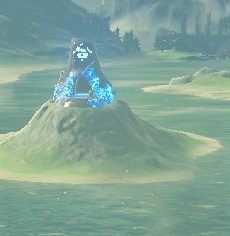
Located on an islet north of the [[Lanayru Wetlands]], it can be reached via an underwater S-shaped pathway from the western shore, or using the raft from the southern [[Mercay Island]]. The shrine is surrounded by thorny bush that can be burnt away; otherwise, the shrine can be reached by using [[Revali's Gale]]. The islet is guarded by a couple of [[Lizalfos]]. | |||
==Speed of Light== | ==Speed of Light== | ||
===Method 1=== | |||
As soon as Link enters, drop to the ledge on the right to get a chest for an [[Opal]]. | As soon as Link enters, drop to the ledge on the right to get a chest for an [[Opal]]. | ||
| Line 37: | Line 41: | ||
Go ahead and activate the altar and collect the [[Spirit Orb]] from [[Sheh Rata]]. | Go ahead and activate the altar and collect the [[Spirit Orb]] from [[Sheh Rata]]. | ||
===Method 2=== | |||
The shrine can also be cleared without ever using the laser. | |||
Once the chest with the [[Opal]] is reached, make your way to the switch platform by using [[Cryonis]]. Create a bomb and place it right next to the switch on a corner as close to the edge as possible. Create a second bomb (be it a cube or a sphere) and place it on the platform on the opposite corner's edge. The further away they are, the less likely their explosion range will detonate the other bomb. | |||
Make your way to the altar door and detonate the first bomb. This will lower the water level so that you can place the barrel on the floor switch. Once the floor switch is activated and the door is open, go through it and detonate the second bomb to make the water rise once again. Create a Cryonis block to reach the second chest that has the [[Giant Boomerang]]. | |||
Activate the altar and collect the [[Spirit Orb]] from [[Sheh Rata]]. | |||
{{Listbox|Breath of the Wild Shrines|hide=hide}} | {{Listbox|Breath of the Wild Shrines|hide=hide}} | ||
{{Cat|Breath of the Wild Shrines}} | {{Cat|Breath of the Wild Shrines}} | ||
Revision as of 19:19, September 8, 2022
| This article is a stub. You can help the Zelda Dungeon Wiki by expanding it. |
Games | ||
Location | On an unnamed island north of Moor Garrison Ruins in the Lanayru Wetlands | |
Inhabitants | ||
Items | ||
| Guides | ||
|---|---|---|
Walkthrough | ||
Sheh Rata Shrine is one of the many Shrine of Trials from Breath of the Wild.
Requirements
Located on an islet north of the Lanayru Wetlands, it can be reached via an underwater S-shaped pathway from the western shore, or using the raft from the southern Mercay Island. The shrine is surrounded by thorny bush that can be burnt away; otherwise, the shrine can be reached by using Revali's Gale. The islet is guarded by a couple of Lizalfos.
Speed of Light
Method 1
As soon as Link enters, drop to the ledge on the right to get a chest for an Opal.
Go back up the ramp to the starting area. Turn the wheel, this will rotate the laser platform causing it to strike the switch and the water level will rise up.
Using Cryonis, make a path to the switch on the right-side wall. Place a square bomb next to the switch, then head back to the starting area.
Next, turn the wheel again to rotate the laser platform again, and as soon as the platform starts moving, jump into the water and dash across before the water level lowers to the open doorway across from the entrance.
Once in the room across from the starting area, use Magnesis to place the barrel on the floor switch. Move into the altar room, then detonate a bomb and the water will rise. Use Cryonis to create an ice pillar next to the chest in the altar room. Climb the pillar and get the Giant Boomerang.
Go ahead and activate the altar and collect the Spirit Orb from Sheh Rata.
Method 2
The shrine can also be cleared without ever using the laser.
Once the chest with the Opal is reached, make your way to the switch platform by using Cryonis. Create a bomb and place it right next to the switch on a corner as close to the edge as possible. Create a second bomb (be it a cube or a sphere) and place it on the platform on the opposite corner's edge. The further away they are, the less likely their explosion range will detonate the other bomb.
Make your way to the altar door and detonate the first bomb. This will lower the water level so that you can place the barrel on the floor switch. Once the floor switch is activated and the door is open, go through it and detonate the second bomb to make the water rise once again. Create a Cryonis block to reach the second chest that has the Giant Boomerang.
Activate the altar and collect the Spirit Orb from Sheh Rata.


