Rebonack: Difference between revisions
Jump to navigation
Jump to search
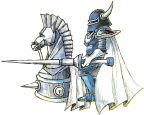
Official Artwork of Rebonack
Want an adless experience? Log in or Create an account.
Curmudgeon (talk | contribs) (game data added) |
m (Text replacement - "Down Thrust" to "Downward Thrust") |
||
| (10 intermediate revisions by 7 users not shown) | |||
| Line 1: | Line 1: | ||
{{Infobox|boss | {{Infobox|boss | ||
| image = [[File:IronKnuckleAoL(Art).png|200px]] | |||
|image = [[File:IronKnuckleAoL(Art).png| | | caption = Official Artwork of Rebonack | ||
|caption = | | threat = 7 | ||
|threat = 7 | | attack = Sword Beams<br/>Charging | ||
|attack = Sword Beams <br> Charging | | weapon = [[Sword]] | ||
|game = ''[[Zelda II: The Adventure of Link|The Adventure of Link]]'' | | game = ''[[Zelda II: The Adventure of Link|The Adventure of Link]]'' | ||
|dungeon = [[Island Palace | | dungeon = [[Island Palace]] | ||
| reward = | |||
|reward = | |||
}} | }} | ||
The optimal strategy for defeating this boss is to utilize the [[Downward Thrust]]. After | '''Rebonack''', also known as '''Ironknuckle''', is the third [[Boss]] of ''[[Zelda II: The Adventure of Link|The Adventure of Link]]''. It is a blue Iron Knuckle mounted atop a mechanical horse. Rebonack is located within the [[Island Palace]] as the boss, and appears twice as a [[Mini-Boss|mini-boss]] in [[Three-Eye Rock Palace]] where it defends the [[Cross]]. | ||
The optimal strategy for defeating this boss is to utilize the [[Down Thrust|Downward Thrust]]. After Rebonack has been ousted from its horse, proceed to attack it as Link would a regular Blue [[Iron Knuckle]]. | |||
==Game Data== | ==Game Data== | ||
{| class="wikitable" style="text-align:center;" | {| class="wikitable" style="float:left; text-align:center; width:480px;" | ||
|+ style="text-align:left;" | <big>Rebonack (Mounted)</big> | |||
| rowspan="3" width="25%" |[[File:Ironknuckle-AoL-Sprite.png|75px]] | |||
| width="25%" | [[Experience Point]]s || width="50%" | 0 | |||
|- | |- | ||
| Item Drop || None | |||
|- | |- | ||
| Enemy Habitat || height="90px" | [[Island Palace]]<br/>[[Three-Eye Rock Palace]] | |||
|- | |- | ||
{{#vardefine:CommentBoxID|{{#if:{{#varexists:CommentBoxID}}|{{#expr:{{#var:CommentBoxID}}+1}}|1}}}} | |||
| class="{{#var:CommentBoxID}}Column0 _toggler-{{#var:CommentBoxID}}Column0 _toggler-{{#var:CommentBoxID}}Column1 _toggler-{{#var:CommentBoxID}}row" align="left" style="{{round|10}}; background:{{{buttonbackground|#F2F2F2}}}; text-align:center;"| {{{button1|Combat Data}}} | |||
| class="{{#var:CommentBoxID}}Column1 _toggler-{{#var:CommentBoxID}}Column0 _toggler-{{#var:CommentBoxID}}Column1 _toggler-{{#var:CommentBoxID}}row" align="left" style="{{round|10}}; background:{{{buttonbackground|#F2F2F2}}}; display:none; text-align: center;" | {{{button2|Hide}}} || colspan="5" style="text-align:left;" | •Use [[Down Thrust|Downward Thrust]] | |||
|-class="{{#var:CommentBoxID}}row" style="display:none;" | |||
| colspan="6" | | |||
{| | |||
! colspan="2" | Defensive Stats |||| colspan="3" | Offensive Stats | |||
|- | |- | ||
! | ! Attack Level || Hits to Kill |||| Life Level || Contact Container Damage || Projectile Container Damage | ||
|- | |- | ||
| 1 || 19 |||| 1 || 3 || - | |||
|- | |- | ||
| | | 2 || 13 |||| 2 || 2.25 || - | ||
|- | |- | ||
| | | 3 || 10 |||| 3 || 1.75 || - | ||
|- | |- | ||
| | | 4 || 7 |||| 4 || 1.5 || - | ||
|- | |- | ||
| | | 5 || 5 |||| 5 || 1.25 || - | ||
|- | |- | ||
| | | 6 || 4 |||| 6 || 1 || - | ||
|- | |- | ||
| | | 7 || 3 |||| 7 || .875 || - | ||
|- | |- | ||
| | | 8 || 2 |||| 8 || .75 || - | ||
|} | |||
|} | |||
{{Clear|left}} | |||
{| class="wikitable" style="float:left; text-align:center; width:480px;" | |||
|+ style="text-align:left;" | <big>Rebonack (Dismounted)</big> | |||
| rowspan="3" width="25%" |[[File:IronknuckleBlue-Sprite-AOL.png]] | |||
| width="25%" | [[Experience Point]]s || width="50%" | 300 | |||
|- | |- | ||
| 8 || 2 |||| 8 || | | Item Drop || None | ||
|- | |||
| Enemy Habitat || height="90px" | [[Island Palace]]<br/>[[Three-Eye Rock Palace]] | |||
|- | |||
{{#vardefine:CommentBoxID|{{#if:{{#varexists:CommentBoxID}}|{{#expr:{{#var:CommentBoxID}}+1}}|1}}}} | |||
| class="{{#var:CommentBoxID}}Column0 _toggler-{{#var:CommentBoxID}}Column0 _toggler-{{#var:CommentBoxID}}Column1 _toggler-{{#var:CommentBoxID}}row" align="left" style="{{round|10}}; background:{{{buttonbackground|#F2F2F2}}}; text-align:center;"| {{{button1|Combat Data}}} | |||
| class="{{#var:CommentBoxID}}Column1 _toggler-{{#var:CommentBoxID}}Column0 _toggler-{{#var:CommentBoxID}}Column1 _toggler-{{#var:CommentBoxID}}row" align="left" style="{{round|10}}; background:{{{buttonbackground|#F2F2F2}}}; display:none; text-align: center;" | {{{button2|Hide}}} || colspan="5" style="text-align:left;" | | |||
|-class="{{#var:CommentBoxID}}row" style="display:none;" | |||
| colspan="6" | | |||
{| | |||
! colspan="2" | Defensive Stats |||| colspan="3" | Offensive Stats | |||
|- | |||
! Attack Level || Hits to Kill |||| Life Level || Contact Container Damage || Projectile Container Damage | |||
|- | |||
| 1 || 24 |||| 1 || 3 || 3 | |||
|- | |||
| 2 || 16 |||| 2 || 2.25 || 2.25 | |||
|- | |||
| 3 || 12 |||| 3 || 1.75 || 1.75 | |||
|- | |||
| 4 || 8 |||| 4 || 1.5 || 1.5 | |||
|- | |||
| 5 || 6 |||| 5 || 1.25 || 1.25 | |||
|- | |||
| 6 || 4 |||| 6 || 1 || 1 | |||
|- | |||
| 7 || 3 |||| 7 || .875 || .875 | |||
|- | |||
| 8 || 2 |||| 8 || .75 || .75 | |||
|} | |||
|} | |} | ||
{{clear|left}} | |||
==Gallery== | |||
<gallery> | |||
File:Art-and-Artificats-Rebonack.png|''The Official Rebonack Artwork'' | |||
File:Rebonack-Futabasha-AOL.png|''Rebonack Artwork from the Futabasha Guide'' | |||
File:AoL_futami_Rebonack.png|''Rebonack Artwork from the Futami Guide'' | |||
File:Ironknuckle-AoL-Sprite.png|''Mounted Rebonack Sprite'' | |||
File:IronknuckleBlue-Sprite-AOL.png|''Rebonack Sprite'' | |||
</gallery> | |||
{{Listbox|The Adventure of Link|Bosses}} | |||
{{Cat|The Adventure of Link Bosses}} | {{Cat|The Adventure of Link Bosses}} | ||
Revision as of 20:19, November 8, 2021
Rebonack
.png)
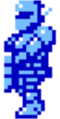
Official Artwork of Rebonack
Games | ||
Dungeons | ||
Threat | ||
Attacks | Sword Beams | |
Effective | ||
Rebonack, also known as Ironknuckle, is the third Boss of The Adventure of Link. It is a blue Iron Knuckle mounted atop a mechanical horse. Rebonack is located within the Island Palace as the boss, and appears twice as a mini-boss in Three-Eye Rock Palace where it defends the Cross.
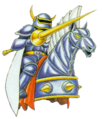
The optimal strategy for defeating this boss is to utilize the Downward Thrust. After Rebonack has been ousted from its horse, proceed to attack it as Link would a regular Blue Iron Knuckle.
Game Data
| Experience Points | 0 | ||||
| Item Drop | None | ||||
| Enemy Habitat | Island Palace Three-Eye Rock Palace | ||||
| Combat Data | •Use Downward Thrust | ||||
| Experience Points | 300 | ||||
| Item Drop | None | ||||
| Enemy Habitat | Island Palace Three-Eye Rock Palace | ||||
| Combat Data | |||||
Gallery
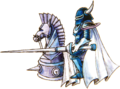
The Official Rebonack Artwork
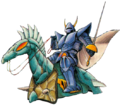
Rebonack Artwork from the Futabasha Guide
Rebonack Artwork from the Futami Guide

Mounted Rebonack Sprite
Rebonack Sprite


