Phantom Hourglass Courage Gems: Difference between revisions
(Created page with "Below is a listing of all 20 Courage Gems that Link finds on his quest. When Link has collected 10 Courage Gems he can restore a portion of Ciela's power. In order to...") |
mNo edit summary |
||
| (5 intermediate revisions by one other user not shown) | |||
| Line 14: | Line 14: | ||
'''Location''': [[Masked Ship Shop]] | '''Location''': [[Masked Ship Shop]] | ||
'''Conditions''': | '''Conditions''': Need 500 Rupees | ||
The Masked Ship Shop is only accessible when the internal clock of your console is between 10pm and Midnight from Monday through Friday, or from 10am to Noon on Saturday or Sunday. [[Masked Beedle]] will sell the the Courage Gem for 500 Rupees.}} | The Masked Ship Shop is only accessible when the internal clock of your console is between 10pm and Midnight from Monday through Friday, or from 10am to Noon on Saturday or Sunday. [[Masked Beedle]] will sell the the Courage Gem for 500 Rupees.}} | ||
{{Gallery/Box|file=Courage-Gem-03.png|caption='''Courage Gem #3''' | |||
'''Location''': [[Isle of Gust]] | |||
'''Conditions''': Reach [[Isle of Gust]] | |||
Once you reach the far right of the map, you'll see a sign signifying gusty winds ahead. Ignore it for now and climb down the steps. There is a cracked wall nearby and you can use the nearby bomb flower to blow it open. Inside you'll find a treasure chest that contains a Courage Gem.}} | |||
{{Gallery/Box|file=Courage-Gem-04.png|caption='''Courage Gem #4''' | |||
'''Location''': [[Temple of Wind]] | |||
'''Conditions''': Reach Temple of Wind | |||
On Floor B1 of the Temple of Wind, you'll find a series of wind geysers in a vertical line at the south end of the room. Ride across all four wind geysers to reach a platform with a treasure chest. Open it up to get a Courage Gem.}} | |||
{{Gallery/Box|file=Courage-Gem-05.png|caption='''Courage Gem #5''' | |||
'''Location''': [[Temple of Courage]] | |||
'''Conditions''': Reach Temple of Courage | |||
In the final room of the temple, just before fighting the boss, don't climb up the stairs just yet. Instead, walk around the staircase and you'll find a cracked wall. Blast it away with a bomb and open the treasure chest to get a Courage Gem.}} | |||
{{Gallery/Box|file=Courage-Gem-06.png|caption='''Courage Gem #6''' | |||
'''Location''': [[Mercay Island]] | |||
'''Conditions''': Acquire the [[Bow]] and Arrow. | |||
While on Mercay Island, there are a pair of optional Bomb Caverns that you can enter, which leads to [[Freedle]] at the northeast corner of the island. In the second cavern, while crossing the large bridge, aim your Boomerang off the screen to the south to find a switch. Hit it and open the chest that appears to get the gem.}} | |||
{{Gallery/Box|file=Courage-Gem-07.png|caption='''Courage Gem #7''' | |||
'''Location''': [[Temple of the Ocean King]] | |||
'''Conditions''': Complete [[Ghost Ship (Phantom Hourglass)|Ghost Ship]] | |||
When you reach Floor B8 of the Temple of the Ocean King, you'll find a pedestal near the northeast part of the room where you can place the Triangle Crystal. Do so and a treasure chest will appear, almost as if it is floating in mid-air. Wait until the nearby phantom is walking to the east and then make a run for it. There is a secret path directly above the treasure chest, allowing you to reach it to get the Courage Gem.}} | |||
{{Gallery/Box|file=Courage-Gem-08.png|caption='''Courage Gem #8''' | |||
'''Location''': [[Linebeck's Ship]] | |||
'''Conditions''': Reach [[Southeast Quadrant]] | |||
Once you reach the Southeast Quadrant, you'll encounter larger Pirate Ships. Sail right up to the ship and allow the enemies to ambush you. On Linebeck's Ship, defeat all of the [[Miniblin]]s that appear. Linebeck will reward you with a Courage Gem.}} | |||
{{Gallery/Box|file=Courage-Gem-09.png|caption='''Courage Gem #9''' | |||
'''Location''': [[Dee Ess Island]] | |||
'''Conditions''': Reach [[Southeast Quadrant]] | |||
At the west side of Dee Ess Island, you will find a small statue and if you smack it, it tells you that something is buried under the lower screen's Menu button. The solution to this puzzle is to understand the shape of the island. The Menu Button on the DS screen is located at the bottom-left of the lower screen. Drop down into the pit at the south end of the island and use your shovel to dig up the bottom-left most spot to uncover a Courage Gem.}} | |||
{{Gallery/Box|file=Courage-Gem-10.png|caption='''Courage Gem #10''' | |||
'''Location''': [[Dee Ess Island]] | |||
'''Conditions''': Reach [[Southeast Quadrant]] | |||
At the north end of Dee Ess Island, drop down into the pit and you'll encounter two enemy Eye Brutes. To defeat them, shoot their eye with an arrow to stun them and then deliver some sword slashes. Defeat both of them and open the treasure chest that appears to get a Courage Gem.}} | |||
{{Gallery/Box|file=Courage-Gem-11.png|caption='''Courage Gem #11''' | |||
'''Location''': Various | |||
'''Conditions''': Complete [[Goron Temple]] | |||
After completing the Goron Temple, you will soon get a letter in the mail from [[Gongoron]]. You will have to close your game and turn your console back on to trigger this event to happen. Gongoron mentions he has gotten part-time job at a Southeastern Sea isle, but he includes a Courage Gem as a gift.}} | |||
{{Gallery/Box|file=Courage-Gem-12.png|caption='''Courage Gem #12''' | |||
'''Location''': [[Goron Island]] | |||
'''Conditions''': Acquire [[Grappling Hook]] | |||
Return to Goron Island and make your way over to the Goron that was scared of the [[Yellow Chuchu]] on the cliff. From the bridge in near the south-central part of the island, head north and around the pathway to find this Goron. From here, use the Grappling Hook on the rock to reach a platform. Then walk over to the nearby treasure chest and get the Courage Gem.}} | |||
{{Gallery/Box|file=Courage-Gem-13.png|caption='''Courage Gem #13''' | |||
'''Location''': [[Isle of Ember]] | |||
'''Conditions''': Acquire [[Grappling Hook]] | |||
Return to the Isle of Ember and make your way to the northwest part of the island. There is a small island with a treasure chest on it. Grapple on over and open the treasure chest to get a Courage Gem.}} | |||
{{Gallery/Box|file=Courage-Gem-14.png|caption='''Courage Gem #14''' | |||
'''Location''': [[Molida Island]] | |||
'''Conditions''': Acquire [[Grappling Hook]] | |||
Just west of the Temple of Courage on Molida Island, you will find a wooden peg, along with another wooden peg on the nearby island. Create a tightrope and then walk across it. Open the treasure chest to get the Courage Gem.}} | |||
{{Gallery/Box|file=Courage-Gem-15.png|caption='''Courage Gem #15''' | |||
'''Location''': [[Bannan Island]] | |||
'''Conditions''': Acquire [[Grappling Hook]] | |||
Make your way to the northeast portion of Bannan Island. Use the Grappling Hook to create a tight rope and make your way over to the large island. Open the two treasure chests here, one containing a Big Green Rupee, and other holding a Courage Gem.}} | |||
{{Gallery/Box|file=Courage-Gem-16.png|caption='''Courage Gem #16''' | |||
'''Location''': [[Uncharted Island]] | |||
'''Conditions''': Acquire [[Grappling Hook]] | |||
Return to the Uncharted Island and re-enter the cave where you met the [[Golden Chief Cylos]]. On the east side of the room, create a tightrope using the two wooden pegs. Walk across and open the treasure chest to get a Courage Gem.}} | |||
{{Gallery/Box|file=Courage-Gem-17.png|caption='''Courage Gem #17''' | |||
'''Location''': [[Temple of the Ocean King]] | |||
'''Conditions''': Acquire [[Grappling Hook]] | |||
Return to Floor B1 and just to the left of the entrance, there are a pair of wooden pegs. Use the Grappling Hook to create a tightrope and walk on top of it. While on top of it, use your Bow and Arrow to shoot the eye switch. This causes a treasure chest to appear at the southeast corner of the room. Wait for the Red Phantom on the right side to be heading downward and then quickly run over to the right. Open it up before it disappears to get a Courage Gem.}} | |||
{{Gallery/Box|file=Courage-Gem-18.png|caption='''Courage Gem #18''' | |||
'''Location''': [[Isle of the Dead]] | |||
'''Conditions''': Reach [[Northeast Quadrant]] | |||
In the first cave at the Isle of the Dead, blast a hole in the wall at the west side and make your way through the Rupoor maze. The Courage Gem is found in one of the treasure chests.}} | |||
{{Gallery/Box|file=Courage-Gem-19.png|caption='''Courage Gem #19''' | |||
'''Location''': [[Isle of Ruins]] | |||
'''Conditions''': After acquiring the [[Regal Necklace]] | |||
After draining the water, Return to the Bremeur's Temple at the northwest part of the map. From here, cross the bridge that Bremeur extended and once again make your way to the far east of the island, staying on the higher platform. Just southwest of Doylan's pyramid, there is a treasure chest that was previously underwater. Open it up to get the Courage Gem.}} | |||
{{Gallery/Box|file=Courage-Gem-20.png|caption='''Courage Gem #20''' | |||
'''Location''': [[Mutoh's Temple]] | |||
'''Conditions''': Acquire [[Hammer]] | |||
When you reach Floor B2 for the first time, after using the Hammer to smash all the floor switches, you'll reach the southwest corner of the room. Be sure to check out the far corner of the room to find a treasure chest that contains the Courage Gem.}} | |||
Revision as of 15:17, August 11, 2019
Below is a listing of all 20 Courage Gems that Link finds on his quest. When Link has collected 10 Courage Gems he can restore a portion of Ciela's power. In order to do so, he must take the gems to Spirit Island, which is a hidden Island located just south of Molida Island. If Link has collected all 20 of these gems, he can take them to the spring at Spirit Island to fully restore the power of Ciela. The 20 Courage Gems are listed in roughly the order they become available to collect.
Courage Gem #1
Location: Spirit Island
Conditions: Acquire Cannon
When Link first arrives at Spirit Island, there is a treasure chest near the dock that contains the Courage Gem.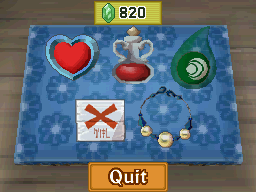
Courage Gem #2
Location: Masked Ship Shop
Conditions: Need 500 Rupees
The Masked Ship Shop is only accessible when the internal clock of your console is between 10pm and Midnight from Monday through Friday, or from 10am to Noon on Saturday or Sunday. Masked Beedle will sell the the Courage Gem for 500 Rupees.
Courage Gem #3
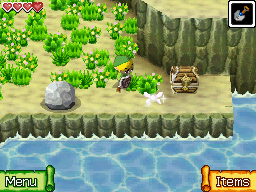
Location: Isle of Gust
Conditions: Reach Isle of Gust
Once you reach the far right of the map, you'll see a sign signifying gusty winds ahead. Ignore it for now and climb down the steps. There is a cracked wall nearby and you can use the nearby bomb flower to blow it open. Inside you'll find a treasure chest that contains a Courage Gem.
Courage Gem #4
Location: Temple of Wind
Conditions: Reach Temple of Wind
On Floor B1 of the Temple of Wind, you'll find a series of wind geysers in a vertical line at the south end of the room. Ride across all four wind geysers to reach a platform with a treasure chest. Open it up to get a Courage Gem.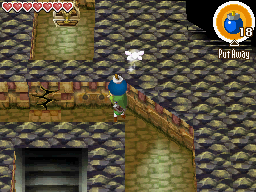
Courage Gem #5
Location: Temple of Courage
Conditions: Reach Temple of Courage
In the final room of the temple, just before fighting the boss, don't climb up the stairs just yet. Instead, walk around the staircase and you'll find a cracked wall. Blast it away with a bomb and open the treasure chest to get a Courage Gem.
Courage Gem #6
Location: Mercay Island
Conditions: Acquire the Bow and Arrow.
While on Mercay Island, there are a pair of optional Bomb Caverns that you can enter, which leads to Freedle at the northeast corner of the island. In the second cavern, while crossing the large bridge, aim your Boomerang off the screen to the south to find a switch. Hit it and open the chest that appears to get the gem.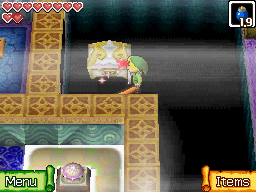
Courage Gem #7
Location: Temple of the Ocean King
Conditions: Complete Ghost Ship
When you reach Floor B8 of the Temple of the Ocean King, you'll find a pedestal near the northeast part of the room where you can place the Triangle Crystal. Do so and a treasure chest will appear, almost as if it is floating in mid-air. Wait until the nearby phantom is walking to the east and then make a run for it. There is a secret path directly above the treasure chest, allowing you to reach it to get the Courage Gem.
Courage Gem #8
Location: Linebeck's Ship
Conditions: Reach Southeast Quadrant
Once you reach the Southeast Quadrant, you'll encounter larger Pirate Ships. Sail right up to the ship and allow the enemies to ambush you. On Linebeck's Ship, defeat all of the Miniblins that appear. Linebeck will reward you with a Courage Gem.
Courage Gem #9
Location: Dee Ess Island
Conditions: Reach Southeast Quadrant
At the west side of Dee Ess Island, you will find a small statue and if you smack it, it tells you that something is buried under the lower screen's Menu button. The solution to this puzzle is to understand the shape of the island. The Menu Button on the DS screen is located at the bottom-left of the lower screen. Drop down into the pit at the south end of the island and use your shovel to dig up the bottom-left most spot to uncover a Courage Gem.
Courage Gem #10
Location: Dee Ess Island
Conditions: Reach Southeast Quadrant
At the north end of Dee Ess Island, drop down into the pit and you'll encounter two enemy Eye Brutes. To defeat them, shoot their eye with an arrow to stun them and then deliver some sword slashes. Defeat both of them and open the treasure chest that appears to get a Courage Gem.
Courage Gem #11
Location: Various
Conditions: Complete Goron Temple
After completing the Goron Temple, you will soon get a letter in the mail from Gongoron. You will have to close your game and turn your console back on to trigger this event to happen. Gongoron mentions he has gotten part-time job at a Southeastern Sea isle, but he includes a Courage Gem as a gift.
Courage Gem #12
Location: Goron Island
Conditions: Acquire Grappling Hook
Return to Goron Island and make your way over to the Goron that was scared of the Yellow Chuchu on the cliff. From the bridge in near the south-central part of the island, head north and around the pathway to find this Goron. From here, use the Grappling Hook on the rock to reach a platform. Then walk over to the nearby treasure chest and get the Courage Gem.
Courage Gem #13
Location: Isle of Ember
Conditions: Acquire Grappling Hook
Return to the Isle of Ember and make your way to the northwest part of the island. There is a small island with a treasure chest on it. Grapple on over and open the treasure chest to get a Courage Gem.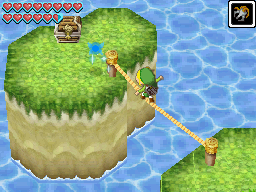
Courage Gem #14
Location: Molida Island
Conditions: Acquire Grappling Hook
Just west of the Temple of Courage on Molida Island, you will find a wooden peg, along with another wooden peg on the nearby island. Create a tightrope and then walk across it. Open the treasure chest to get the Courage Gem.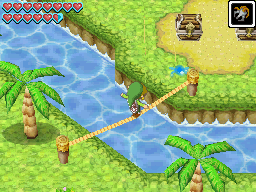
Courage Gem #15
Location: Bannan Island
Conditions: Acquire Grappling Hook
Make your way to the northeast portion of Bannan Island. Use the Grappling Hook to create a tight rope and make your way over to the large island. Open the two treasure chests here, one containing a Big Green Rupee, and other holding a Courage Gem.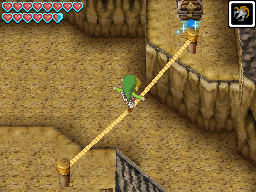
Courage Gem #16
Location: Uncharted Island
Conditions: Acquire Grappling Hook
Return to the Uncharted Island and re-enter the cave where you met the Golden Chief Cylos. On the east side of the room, create a tightrope using the two wooden pegs. Walk across and open the treasure chest to get a Courage Gem.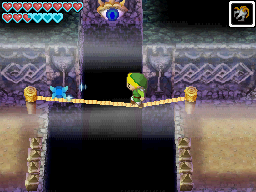
Courage Gem #17
Location: Temple of the Ocean King
Conditions: Acquire Grappling Hook
Return to Floor B1 and just to the left of the entrance, there are a pair of wooden pegs. Use the Grappling Hook to create a tightrope and walk on top of it. While on top of it, use your Bow and Arrow to shoot the eye switch. This causes a treasure chest to appear at the southeast corner of the room. Wait for the Red Phantom on the right side to be heading downward and then quickly run over to the right. Open it up before it disappears to get a Courage Gem.
Courage Gem #18
Location: Isle of the Dead
Conditions: Reach Northeast Quadrant
In the first cave at the Isle of the Dead, blast a hole in the wall at the west side and make your way through the Rupoor maze. The Courage Gem is found in one of the treasure chests.
Courage Gem #19
Location: Isle of Ruins
Conditions: After acquiring the Regal Necklace
After draining the water, Return to the Bremeur's Temple at the northwest part of the map. From here, cross the bridge that Bremeur extended and once again make your way to the far east of the island, staying on the higher platform. Just southwest of Doylan's pyramid, there is a treasure chest that was previously underwater. Open it up to get the Courage Gem.
Courage Gem #20
Location: Mutoh's Temple
Conditions: Acquire Hammer
When you reach Floor B2 for the first time, after using the Hammer to smash all the floor switches, you'll reach the southwest corner of the room. Be sure to check out the far corner of the room to find a treasure chest that contains the Courage Gem.


