Molduking: Difference between revisions
No edit summary |
EmeraldGamer (talk | contribs) |
||
| Line 18: | Line 18: | ||
==Strategy== | ==Strategy== | ||
This boss swims underneath the sand, and is practically identical to its little brother, the [[Molduga]]. It has extremely good hearing, so if you move quickly it will be alerted and begin to swim to you. The best thing to do here is to stand on land which isn't sand, such as a broken pillar or a rock. You can use its hearing to your advantage though, by standing on a rock and tossing out a [[Remote Bomb (Rune)|Bomb]] in its direction. It should notice it, and begin swimming toward it. Once it reaches it, the Molduking will jump out of the sand, swallowing the bomb. At this point, you should detonate the bomb and the boss will fall to the ground, vulnerable to hits. This enemy has a very high defense, and regular sword slashes will not deal a lot of damage. The trick here is to utilise [[Urbosa's Fury]], which deals a great amount of damage. Using this in conjunction with a powerful two-handed weapon like a [[Royal Claymore]] will deal sound damage. Repeat this process a few times to take down the boss. | This boss swims underneath the sand, and is practically identical to its little brother, the [[Molduga]]. It has extremely good hearing, so if you move quickly it will be alerted and begin to swim to you. The best thing to do here is to stand on land which isn't sand, such as a broken pillar or a rock. You can use its hearing to your advantage though, by standing on a rock and tossing out a [[Remote Bomb (Rune)|Bomb]] in its direction. It should notice it, and begin swimming toward it. Once it reaches it, the Molduking will jump out of the sand, swallowing the bomb. At this point, you should detonate the bomb and the boss will fall to the ground, vulnerable to hits. This enemy has a very high defense, and regular sword slashes will not deal a lot of damage. The trick here is to utilise [[Urbosa's Fury]], which deals a great amount of damage. Using this in conjunction with a powerful two-handed weapon like a [[Royal Claymore]] will deal sound damage. Repeat this process a few times to take down the boss. | ||
{{MagicNavbox|Breath of the Wild|Enemies}} | {{MagicNavbox|Breath of the Wild|Enemies}} | ||
{{Cat|Breath of the Wild Enemies}} | {{Cat|Breath of the Wild Enemies}} | ||
Revision as of 16:28, December 15, 2017
Games | ||
Location | ||
Rewards | Three Chests | |
Threat | ||
Effective | ||
Related | ||
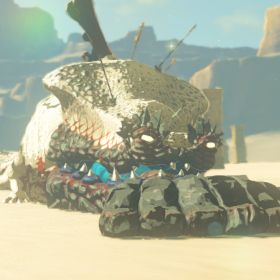
"This massive monster swims beneath the desert's sand. It is a subspecies of Molduga that stored up a great deal of energy by sleeping underground for hundreds of years. Its power is superior to Molduga, as its skin is rich with iron and acts as a protective shield."
Overview
The Molduking is the strongest of all Molduga, and has a slightly different coloring. There is only one in the game, being a part of the second DLC pack: The Champions' Ballad. It is found to the south of the East Barrens in the Gerudo Desert. Upon defeat, it will drop three chests, as well as an array of weapons, such as the Golden Claymore. It will also provide access to the Keive Tala Shrine.
Strategy
This boss swims underneath the sand, and is practically identical to its little brother, the Molduga. It has extremely good hearing, so if you move quickly it will be alerted and begin to swim to you. The best thing to do here is to stand on land which isn't sand, such as a broken pillar or a rock. You can use its hearing to your advantage though, by standing on a rock and tossing out a Bomb in its direction. It should notice it, and begin swimming toward it. Once it reaches it, the Molduking will jump out of the sand, swallowing the bomb. At this point, you should detonate the bomb and the boss will fall to the ground, vulnerable to hits. This enemy has a very high defense, and regular sword slashes will not deal a lot of damage. The trick here is to utilise Urbosa's Fury, which deals a great amount of damage. Using this in conjunction with a powerful two-handed weapon like a Royal Claymore will deal sound damage. Repeat this process a few times to take down the boss.


