Maze Island: Difference between revisions
m (Text replacement - " {{Cat|Phantom Hourglass Islands}}" to " {{Listbox|Phantom Hourglass Islands}} {{Cat|Phantom Hourglass Islands}}") |
mNo edit summary |
||
| Line 9: | Line 9: | ||
}} | }} | ||
In ''[[The Legend of Zelda: Phantom Hourglass|Phantom Hourglass]]'', '''Maze Island''' is an uncharted island located in the [[Northeast Quadrant]]. It is not marked on the [[Sea Chart]] until [[Link]] comes close enough to see it, and then docks there. It is located just northeast of the mountain ring that surrounds the [[Cobble Kingdom]] island, [[Isle of Ruins]]. | In ''[[The Legend of Zelda: Phantom Hourglass|Phantom Hourglass]]'', '''Maze Island''' is an uncharted island located in the [[Northeast Quadrant]]. It is not marked on the [[Sea Chart]] until [[Link (The Wind Waker)#Phantom Hourglass|Link]] comes close enough to see it, and then docks there. It is located just northeast of the mountain ring that surrounds the [[Cobble Kingdom]] island, [[Isle of Ruins]]. | ||
There are three levels, the rewards being a [[Wisdom Gem]], [[Treasure Chart]] and [[Heart Container]] respectively. To play, Link has to run around the maze that covers the whole island, hitting all the [[Gossip Stone]]s within a time limit. The beginners maze has 4 Gossip Stones, where as the Normal and Expert modes have 8 and 14, respectively. Even after hitting all of the Gossip Stones, Link will still need to make it over to the treasure chest in time to claim his award. | There are three levels, the rewards being a [[Wisdom Gem]], [[Treasure Chart]] and [[Heart Container]] respectively. To play, Link has to run around the maze that covers the whole island, hitting all the [[Gossip Stone]]s within a time limit. The beginners maze has 4 Gossip Stones, where as the Normal and Expert modes have 8 and 14, respectively. Even after hitting all of the Gossip Stones, Link will still need to make it over to the treasure chest in time to claim his award. | ||
| Line 26: | Line 26: | ||
*'''Statue #1''': Start the maze by heading straight up north. Run around this windy path and it will lead you to the first statue, so smack it. | *'''Statue #1''': Start the maze by heading straight up north. Run around this windy path and it will lead you to the first statue, so smack it. | ||
*'''Obstacle A''': Cross the bridge above and then climb the steps to the higher platform. Jump across two gaps to the right and continue heading right. | *'''Obstacle A''': Cross the bridge above and then climb the steps to the higher platform. Jump across two gaps to the right and continue heading right. You'll reach another gap, but don't jump across yet. Instead, head south and you will come across a switch. Hit it with your sword and it will lower the spikes to the right. | ||
*'''Statue #2''': Jump of the ledge to the right, head down, and cross the lowered spikes. Run to the right and | *'''Statue #2''': Jump of the ledge to the right, head down, and cross the lowered spikes. Run to the right and you'll get to the 2nd of the statues. You can place a bomb just next to the statue and then smack it with your sword. It will hurt Link but it will blow up a shortcut just below. | ||
*'''Obstacle B''': Head up and climb up the second set of steps that you see on the right. Use the bow to shoot an arrow at the eye switch across the gap. It will lower the spikes that are on the lower platform just nearby and create an unnecessary bridge to the left. | *'''Obstacle B''': Head up and climb up the second set of steps that you see on the right. Use the bow to shoot an arrow at the eye switch across the gap. It will lower the spikes that are on the lower platform just nearby and create an unnecessary bridge to the left. | ||
*'''Statue 3''': Run down the steps and cross the lowered spikes to find the 3rd of the statues. | *'''Statue 3''': Run down the steps and cross the lowered spikes to find the 3rd of the statues. | ||
| Line 44: | Line 44: | ||
*'''Obstacle B''': Climb the steps on the right and head down. There is a crystal switch on this higher platform. Swing at it and it will lower the spikes that are on the lower ground to the right. | *'''Obstacle B''': Climb the steps on the right and head down. There is a crystal switch on this higher platform. Swing at it and it will lower the spikes that are on the lower ground to the right. | ||
*'''Obstacle C''': Jump off the ledge on the right. There is a small pond of water just above you. Pull out your boomerang and trace a path to a crystal switch that is on the other side of the water. This will lower the spikes that are just to the right of the switch. | *'''Obstacle C''': Jump off the ledge on the right. There is a small pond of water just above you. Pull out your boomerang and trace a path to a crystal switch that is on the other side of the water. This will lower the spikes that are just to the right of the switch. | ||
*'''Statue #4''': Now head down and cross the lowered spikes. Run to the right and | *'''Statue #4''': Now head down and cross the lowered spikes. Run to the right and you'll get to the 4th of the statues. You can place a bomb just next to the statue and then smack it with your sword. It will hurt Link but it will blow up a shortcut just below. | ||
*'''Obstacle D''': Head up and climb up the second set of steps that you see on the right. Use the bow to shoot an arrow at the eye switch across the gap. It will lower the spikes that are on the lower platform just nearby and create an unnecessary bridge to the left. | *'''Obstacle D''': Head up and climb up the second set of steps that you see on the right. Use the bow to shoot an arrow at the eye switch across the gap. It will lower the spikes that are on the lower platform just nearby and create an unnecessary bridge to the left. | ||
*'''Statue #5''': Run down the steps and cross the lowered spikes to find the 5th of the statues. | *'''Statue #5''': Run down the steps and cross the lowered spikes to find the 5th of the statues. | ||
| Line 63: | Line 63: | ||
*'''Statue #2''': Smack the second statue and then jump off the ledge at the bottom. | *'''Statue #2''': Smack the second statue and then jump off the ledge at the bottom. | ||
*'''Statue #3''': Run around the tight rope you created and head through the small passage on the left. Just head south from here and the third statue will be waiting for you. | *'''Statue #3''': Run around the tight rope you created and head through the small passage on the left. Just head south from here and the third statue will be waiting for you. | ||
*'''Statue #4''': Go south and | *'''Statue #4''': Go south and you'll come across a small bridge. Cross it and then hit the 4th statue that is waiting for you. | ||
*'''Statue #5''': Run back across the bridge and this time climb the steps to the higher platform. Jump across to small gaps on the right and continue running right. There is another statue in a small enclosed area. Jump down and smack the 5th statue. | *'''Statue #5''': Run back across the bridge and this time climb the steps to the higher platform. Jump across to small gaps on the right and continue running right. There is another statue in a small enclosed area. Jump down and smack the 5th statue. | ||
*'''Obstacle D''': Climb the steps on the right and head down. There is a crystal switch on this higher platform. Swing at it and it will lower the spikes that are on the lower ground to the right. | *'''Obstacle D''': Climb the steps on the right and head down. There is a crystal switch on this higher platform. Swing at it and it will lower the spikes that are on the lower ground to the right. | ||
*'''Statue #6''': Run down the steps at the bottom and then head up on the left side. Take the first left and wrap around the passage to get to the 6th statue. | *'''Statue #6''': Run down the steps at the bottom and then head up on the left side. Take the first left and wrap around the passage to get to the 6th statue. | ||
*'''Obstacle E''': Wrap around right back to the crystal switch you just hit and jump off the ledge on the right. There is a small pond of water just above you. Pull out your boomerang and trace a path to a crystal switch that is on the other side of the water. This will lower the spikes that are just to the right of the switch. | *'''Obstacle E''': Wrap around right back to the crystal switch you just hit and jump off the ledge on the right. There is a small pond of water just above you. Pull out your boomerang and trace a path to a crystal switch that is on the other side of the water. This will lower the spikes that are just to the right of the switch. | ||
*'''Statue #7''': Now head down and cross the lowered spikes. Run to the right and | *'''Statue #7''': Now head down and cross the lowered spikes. Run to the right and you'll get to the 7th of the statues. You can place a bomb just next to the statue and then smack it with your sword. It will hurt Link but it will blow up a shortcut just below. | ||
*'''Statue #8''': Run to the right, climb up the steps, and smack the 8th statue. | *'''Statue #8''': Run to the right, climb up the steps, and smack the 8th statue. | ||
*'''Obstacle F''': Jump off the ledge to the left and then climb up the steps that are just to the north. Use the bow to shoot an arrow at the eye switch across the gap. It will lower the spikes that are on the lower platform just nearby and create an unnecessary bridge to the left. | *'''Obstacle F''': Jump off the ledge to the left and then climb up the steps that are just to the north. Use the bow to shoot an arrow at the eye switch across the gap. It will lower the spikes that are on the lower platform just nearby and create an unnecessary bridge to the left. | ||
Revision as of 15:23, November 28, 2022
- This article is about the region in Phantom Hourglass. For the large zone home to the Maze Island Palace in The Adventure of Link, see Maze Island (The Adventure of Link).

Games | ||
Items | ||
In Phantom Hourglass, Maze Island is an uncharted island located in the Northeast Quadrant. It is not marked on the Sea Chart until Link comes close enough to see it, and then docks there. It is located just northeast of the mountain ring that surrounds the Cobble Kingdom island, Isle of Ruins.
There are three levels, the rewards being a Wisdom Gem, Treasure Chart and Heart Container respectively. To play, Link has to run around the maze that covers the whole island, hitting all the Gossip Stones within a time limit. The beginners maze has 4 Gossip Stones, where as the Normal and Expert modes have 8 and 14, respectively. Even after hitting all of the Gossip Stones, Link will still need to make it over to the treasure chest in time to claim his award.
There is also a loose Wisdom Gem in a chest that can be collected during any of the stages, by bombing a wall near the east side of the island. There are also three Big Green Rupees, that Link can dig up near the northeast (west over pool from the peg), northwest (near pegs used to slingshot Link), and southeast (near bottom corner) corner of the island.
After completing the Maze on Expert mode, you will also be given a reward of a Big Gold Rupee, which is worth 300 rupees. Your name is also permanently engraved on the stone tablet by the dock. Lastly, you are able to play the game at Maze Island, free of charge from this point forward.
Beginner Map for Maze Island
Reward: Wisdom Gem
- Statue #1: Start the maze by heading straight up north. Run around this windy path and it will lead you to the first statue, so smack it.
- Obstacle A: Cross the bridge above and then climb the steps to the higher platform. Jump across two gaps to the right and continue heading right. You'll reach another gap, but don't jump across yet. Instead, head south and you will come across a switch. Hit it with your sword and it will lower the spikes to the right.
- Statue #2: Jump of the ledge to the right, head down, and cross the lowered spikes. Run to the right and you'll get to the 2nd of the statues. You can place a bomb just next to the statue and then smack it with your sword. It will hurt Link but it will blow up a shortcut just below.
- Obstacle B: Head up and climb up the second set of steps that you see on the right. Use the bow to shoot an arrow at the eye switch across the gap. It will lower the spikes that are on the lower platform just nearby and create an unnecessary bridge to the left.
- Statue 3: Run down the steps and cross the lowered spikes to find the 3rd of the statues.
- Statue 4: Run up and take the second second left. Follow this long windy path and when you get to a point where you have a choice, take the short turn north. Then you will have two more options and take the second path heading north. Continue upwards and hit the 4th and final statue.

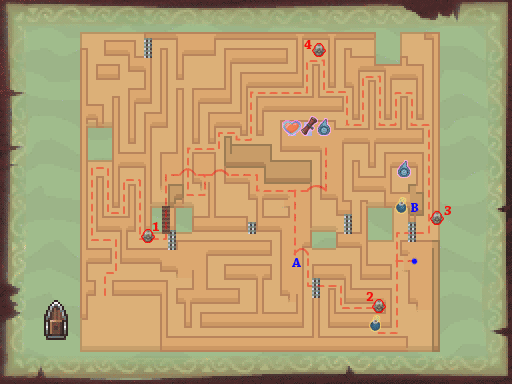
Normal Map for Maze Island
Reward: Treasure Map
- Obstacle A: Start the maze by heading straight up north. At the first blue dot, use the bow and arrow to hit the eye switch above to create a bridge.
- Statue #1: Cross the bridge and run to the top left corner of the map. Smack the 1st statue that is waiting for.
- Statue #2: Run back south across the bridge once again, but this time head down through the right passage. Follow the winding path and hit the 2nd statue at the end of it.
- Statue #3: Run across the bridge and climb the steps to the higher platform. Jump across to small gaps on the right and continue running right. There is another statue in a small enclosed area. Jump down and smack the 3rd statue.
- Obstacle B: Climb the steps on the right and head down. There is a crystal switch on this higher platform. Swing at it and it will lower the spikes that are on the lower ground to the right.
- Obstacle C: Jump off the ledge on the right. There is a small pond of water just above you. Pull out your boomerang and trace a path to a crystal switch that is on the other side of the water. This will lower the spikes that are just to the right of the switch.
- Statue #4: Now head down and cross the lowered spikes. Run to the right and you'll get to the 4th of the statues. You can place a bomb just next to the statue and then smack it with your sword. It will hurt Link but it will blow up a shortcut just below.
- Obstacle D: Head up and climb up the second set of steps that you see on the right. Use the bow to shoot an arrow at the eye switch across the gap. It will lower the spikes that are on the lower platform just nearby and create an unnecessary bridge to the left.
- Statue #5: Run down the steps and cross the lowered spikes to find the 5th of the statues.
- Statue #6: Run up and take the first left. Follow the windy path and you will come to the 6th statue.
- Statue #7: Just head straight down from here and cross the spikes that we lowered earlier. Smack the 7th statue.
- Statue #8: Now run up on the left side. Wrap around the platform with the treasure chests and head right. Take the short path up north and then you will have two options of going north. Run to the second one on the left and follow it to the 8th and final statue.
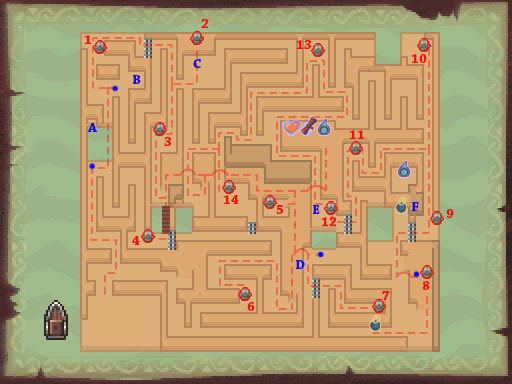
Expert Map for Maze Island
Reward: Heart Container
- Obstacle A: Start the maze by heading straight up north. At the first blue dot, use the bow and arrow to hit the eye switch above to create a bridge.
- Obstacle B: Cross the bridge and continue north to the second blue dot and use the boomerang to hit the crystal switch at your left. It will lower the spikes in the area just above.
- Statue #1: Run to the top left corner of the map and smack the first statue.
- Obstacle C: Run to your right across the now lowered spikes. Take the second path down and then take the immediate path on the right. Use the grappling hook to create a tight rope and slingshot your way to the higher platform.
- Statue #2: Smack the second statue and then jump off the ledge at the bottom.
- Statue #3: Run around the tight rope you created and head through the small passage on the left. Just head south from here and the third statue will be waiting for you.
- Statue #4: Go south and you'll come across a small bridge. Cross it and then hit the 4th statue that is waiting for you.
- Statue #5: Run back across the bridge and this time climb the steps to the higher platform. Jump across to small gaps on the right and continue running right. There is another statue in a small enclosed area. Jump down and smack the 5th statue.
- Obstacle D: Climb the steps on the right and head down. There is a crystal switch on this higher platform. Swing at it and it will lower the spikes that are on the lower ground to the right.
- Statue #6: Run down the steps at the bottom and then head up on the left side. Take the first left and wrap around the passage to get to the 6th statue.
- Obstacle E: Wrap around right back to the crystal switch you just hit and jump off the ledge on the right. There is a small pond of water just above you. Pull out your boomerang and trace a path to a crystal switch that is on the other side of the water. This will lower the spikes that are just to the right of the switch.
- Statue #7: Now head down and cross the lowered spikes. Run to the right and you'll get to the 7th of the statues. You can place a bomb just next to the statue and then smack it with your sword. It will hurt Link but it will blow up a shortcut just below.
- Statue #8: Run to the right, climb up the steps, and smack the 8th statue.
- Obstacle F: Jump off the ledge to the left and then climb up the steps that are just to the north. Use the bow to shoot an arrow at the eye switch across the gap. It will lower the spikes that are on the lower platform just nearby and create an unnecessary bridge to the left.
- Statue #9: Run down the steps and cross the lowered spikes to find the 9th of the statues.
- Statue #10: Just run straight along the right side of the map and you will eventually come to the 10th statue, located at the northeast corner of the map.
- Statue #11: Run back down and take the second left. Follow the windy path and you will come to the 11th statue.
- Statue #12: Just head straight down from here and cross the spikes that we lowered earlier. Smack the 12th statue.
- Statue #13: Now run up on the left side. Wrap around the platform with the treasure chests and head right. Take the short path up north and then you will have two options of going north. Run to the second one on the left and follow it to the 13th statue.
- Statue #14: Follow the long path on the left and at the fork in the road, head left. Run straight down and the final statue is sitting right next to a crystal switch.


