Level 5 (Second Quest): Difference between revisions
m (Text replacement - "{{MagicNavbox\|The Legend of Zelda\|(.*)}}" to "{{Listbox|The Legend of Zelda|$1}}") |
m (Text replacement - "{{References}}↵↵{{Listbox|" to "{{References}} {{clear}} {{Listbox|") |
||
| (3 intermediate revisions by the same user not shown) | |||
| Line 1: | Line 1: | ||
{{Infobox|dungeon | {{Infobox|dungeon | ||
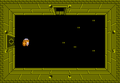
| image | | image = [[File:LoZ_Quest_2_Dungeon_05_Entrance.png]] | ||
| caption | | caption = | ||
| game | | game = ''[[The Legend of Zelda]]'' [[Second Quest]] | ||
| boss | | location = | ||
| miniboss | | quest = | ||
| enemies | | boss = [[Gleeok (The Legend of Zelda)|Three-headed Gleeok]] | ||
| item | | miniboss = [[Gohma (The Legend of Zelda)|Gohma (Blue)]]<br/>[[Manhandla (The Legend of Zelda)|Manhandla]] | ||
| reward | | enemies = [[Blade Trap]]<br/>[[Bubble]]<br/>[[Keese]]<br/>[[Like Like]]<br/>[[Stone Statue]]<br/>[[Vire]]<br/>[[Wizzrobe]]<br/>[[Zol]] | ||
| walkthrough = | | inhab = [[Old Man (The Legend of Zelda)|Old Man]] | ||
| item = [[Bow]] | |||
| prereq = | |||
| reward = [[Triforce Shard#The Legend of Zelda|Triforce Fragment]]<br/>[[Heart Container]] | |||
| related = [[Level 5: The Lizard]]<br/>[[Level 5 (BS The Legend of Zelda MAP 1)]]<br/>[[Level 5 (BS The Legend of Zelda MAP 2)]] | |||
| walkthrough = | |||
}} | }} | ||
'''Level 5''' is the fifth [[dungeon]] in the Second Quest of ''[[The Legend of Zelda]]''. This dungeon hides the fifth [[Triforce Shard]] of the [[Triforce of Wisdom]]. Its location is in the same location as [[Level 4: The Snake]] in the First Quest. In order to get to this dungeon, Link must head, from the [[Starting Screen]], one screen north, two screens west, one screen north, and finally use the [[Raft]] on the edge of the water area, which takes Link to a small island, where the entrance to Level 5 lies. Level 5 has two mini-bosses, a [[Gohma (The Legend of Zelda)|Blue Gohma]] and [[Manhandla (The Legend of Zelda)|Manhandla]]. The [[Boss]] of this dungeon is once again [[Gleeok (The Legend of Zelda)|Gleeok]], only this time he has three heads instead of just two. Once Link has defeated Gleeok, he can collect the fifth Triforce | '''Level 5''' is the fifth [[dungeon]] in the [[Second Quest]] of ''[[The Legend of Zelda]]''. This dungeon hides the fifth [[Triforce Shard#The Legend of Zelda|fragment]] of the [[Triforce of Wisdom]]. Its location is in the same location as [[Level 4: The Snake]] in the First Quest. In order to get to this dungeon, Link must head, from the [[Starting Screen]], one screen north, two screens west, one screen north, and finally use the [[Raft]] on the edge of the water area, which takes Link to a small island, where the entrance to Level 5 lies. Level 5 has two mini-bosses, a [[Gohma (The Legend of Zelda)|Blue Gohma]] and [[Manhandla (The Legend of Zelda)|Manhandla]]. The [[Boss]] of this dungeon is once again [[Gleeok (The Legend of Zelda)|Gleeok]], only this time he has three heads instead of just two. Once Link has defeated Gleeok, he can collect the fifth Triforce fragment. | ||
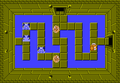
This dungeon's layout is shaped to form the letter "Z". When re-ordered, the layouts of the first five dungeons will spell "ZELDA". | This dungeon's layout is shaped to form the letter "Z". When re-ordered, the layouts of the first five dungeons will spell "ZELDA". | ||
| Line 21: | Line 26: | ||
Below is a list of all the enemies in the dungeon. | Below is a list of all the enemies in the dungeon. | ||
<gallery widths=80 heights=80 caption="Enemies in Level 5 of the Second Quest" perrow=10> | |||
File:Blade-Trap-LoZ-Sprite.png|[[Blade Trap]] | |||
File:Bubble-Red-LoZ-Sprite.png|[[Bubble|Bubble (Red)]] | |||
File:Bubble-Blue-LoZ-Sprite.png|[[Bubble|Bubble (Blue)]] | |||
File:Keese-LoZ-Sprite.png|[[Keese]] | |||
File:Like-Like-Sprite.png|[[Like Like]] | |||
File:Stone-Statue-LoZ-Sprite.png|[[Stone Statue]] | |||
File:Vire-LoZ-Sprite.png|[[Vire]] | |||
File:Wizzrobe-Blue-LoZ-Sprite.png|[[Wizzrobe|Wizzrobe (Blue)]] | |||
File:Wizzrobe-Orange-LoZ-Sprite.png|[[Wizzrobe|Wizzrobe (Orange)]] | |||
File:Zol-Black-LoZ-Sprite.png|[[Zol|Zol (Black)]] | |||
</gallery> | |||
==Gohma== | ==Gohma== | ||
| Line 42: | Line 47: | ||
{{Main|Gleeok (The Legend of Zelda)}} | {{Main|Gleeok (The Legend of Zelda)}} | ||
[[File:Gleeok-LoZ-Sprite.png|100px|right]] | [[File:Gleeok-LoZ-Sprite.png|100px|right]] | ||
[[Gleeok (The Legend of Zelda)|Gleeok]] returns as the boss of Level 5, this time as a three-headed dragon that guards the door that leads to the fifth [[Triforce Shard]]. The battle is exactly the same as the last battle, the main difference being there is an extra head on this version. After defeating Gleeok, Link can pick up another [[Heart Container]] and immediately access the room that contains the Triforce | [[Gleeok (The Legend of Zelda)|Gleeok]] returns as the boss of Level 5, this time as a three-headed dragon that guards the door that leads to the fifth [[Triforce Shard#The Legend of Zelda|Triforce fragment]]. The battle is exactly the same as the last battle, the main difference being there is an extra head on this version. After defeating Gleeok, Link can pick up another [[Heart Container]] and immediately access the room that contains the Triforce fragment. | ||
==Compass & Dungeon Map== | ==Compass & Dungeon Map== | ||
| Line 48: | Line 53: | ||
===Compass=== | ===Compass=== | ||
The [[Compass]] is used by Link to display the location of the Triforce | The [[Compass]] is used by Link to display the location of the Triforce fragment that is hidden in the dungeon via a blinking spot on the map. The Compass is being guarded by five [[Zol]]s, and does not appear until Link has defeated all five of these Zols. This particular room is found one room up, two rooms left, two rooms up, and one room right from the entrance to the dungeon. | ||
===Dungeon Map=== | ===Dungeon Map=== | ||
| Line 58: | Line 63: | ||
==Gallery== | ==Gallery== | ||
<gallery> | <gallery> | ||
File:Compass-Level_5_Quest_2-LoZ.png| | File:Compass-Level_5_Quest_2-LoZ.png|Room with the Compass | ||
File:Map-Level_5_Quest_2-LoZ.png| | File:Map-Level_5_Quest_2-LoZ.png|Room with the Dungeon Map | ||
File:Gleeok-Level_5_Quest_2-LoZ.png| | File:Gleeok-Level_5_Quest_2-LoZ.png|Room with Gleeok | ||
</gallery> | </gallery> | ||
{{References}} | {{References}} | ||
{{clear}} | |||
{{Listbox|The Legend of Zelda|Dungeons}} | {{Listbox|The Legend of Zelda|Dungeons}} | ||
Latest revision as of 21:58, June 20, 2023

Games | ||
Boss | ||
Mini-bosses | ||
Enemies | ||
Inhabitants | ||
Items | ||
Rewards | ||
Related | ||
Level 5 is the fifth dungeon in the Second Quest of The Legend of Zelda. This dungeon hides the fifth fragment of the Triforce of Wisdom. Its location is in the same location as Level 4: The Snake in the First Quest. In order to get to this dungeon, Link must head, from the Starting Screen, one screen north, two screens west, one screen north, and finally use the Raft on the edge of the water area, which takes Link to a small island, where the entrance to Level 5 lies. Level 5 has two mini-bosses, a Blue Gohma and Manhandla. The Boss of this dungeon is once again Gleeok, only this time he has three heads instead of just two. Once Link has defeated Gleeok, he can collect the fifth Triforce fragment.
This dungeon's layout is shaped to form the letter "Z". When re-ordered, the layouts of the first five dungeons will spell "ZELDA".
Items
After going through about half of the quest, Link can finally find the Bow in this dungeon. The Bow is found in a side-scrolling area that is found, from the entrance, one room up, one room left, one room down, down the staircase and up the other side, one room right, one room down, and finally down the staircase. The Bow can be used in conjunction with the Arrow to shoot projectiles at enemies. Each arrow used costs Link one Rupee, so if he is out of Rupees, he cannot use the Bow.
Enemies
Below is a list of all the enemies in the dungeon.
- Enemies in Level 5 of the Second Quest
Gohma
- Main article: Gohma (The Legend of Zelda)

Gohma's first appearance in the Second Quest is in this dungeon, in its upgraded blue form. Link will have to run past it at first to access the room with the Bow, the only weapon that can harm Gohma. Link then can shoot it three times when its eye is open to defeat it and receive a Small Key as his prize.
Gleeok
- Main article: Gleeok (The Legend of Zelda)
Gleeok returns as the boss of Level 5, this time as a three-headed dragon that guards the door that leads to the fifth Triforce fragment. The battle is exactly the same as the last battle, the main difference being there is an extra head on this version. After defeating Gleeok, Link can pick up another Heart Container and immediately access the room that contains the Triforce fragment.
Compass & Dungeon Map
The Compass and Dungeon Map both reappear in this dungeon.
Compass
The Compass is used by Link to display the location of the Triforce fragment that is hidden in the dungeon via a blinking spot on the map. The Compass is being guarded by five Zols, and does not appear until Link has defeated all five of these Zols. This particular room is found one room up, two rooms left, two rooms up, and one room right from the entrance to the dungeon.
Dungeon Map
The Dungeon Map, once obtained, shows Link the entire layout of the dungeon. This allows Link to find and search through all unexplored rooms, causing him to uncover some secrets that he may have not found. The room where the map is can be found by going one room up and two rooms left from the entrance. Defeat all of the enemies to cause the Map to appear in the middle of the room.
Keys & Locked Doors
There are multiple Small Keys and Locked Doors found throughout Level 5. There are three total Small Keys available to be collected in this dungeon; however, one of them is not obtainable until Link acquires the Stepladder in Level 6. There are only two Locked Doors found throughout the dungeon, but all of them must be opened to complete the dungeon.
Gallery
Room with the Compass
Room with the Dungeon Map
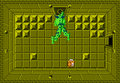
Room with Gleeok


