Lanmola: Difference between revisions
m (→Gallery) |
mNo edit summary |
||
| Line 1: | Line 1: | ||
{{Enemy | {{Enemy | ||
|name = Lanmola | |name = Lanmola | ||
|image = [[File:Lanmola-LoZ-Art.png|200px]]<br>''Artwork from [[The Legend of Zelda]]'' | |image = [[File:Lanmola-LoZ-Art.png|200px]]<br>''Lanmola Artwork from [[The Legend of Zelda]] Manual'' | ||
|game = ''[[The Legend of Zelda]]''<br>''[[The Legend of Zelda: A Link to the Past|A Link to the Past]]''<br>''[[The Legend of Zelda: Link's Awakening|Link's Awakening]]'' | |game = ''[[The Legend of Zelda]]''<br>''[[The Legend of Zelda: A Link to the Past|A Link to the Past]]''<br>''[[The Legend of Zelda: Link's Awakening|Link's Awakening]]'' | ||
|habitat = '''''The Legend of Zelda'''''<br>[[Level 9: Death Mountain]] | |habitat = '''''The Legend of Zelda'''''<br>[[Level 9: Death Mountain]] | ||
| Line 30: | Line 30: | ||
==Gallery== | ==Gallery== | ||
<gallery> | <gallery> | ||
File:Lanmola-Red-LoZ-Art.png|Red Lanmola Artwork from ''[[The Legend of Zelda]]''. | File:Lanmola-Red-LoZ-Art.png|Red Lanmola Artwork from [[Million Publications The Legend of Zelda Strategy Guide|Million Publications Strategy Guide]] for ''[[The Legend of Zelda]]''. | ||
File:Lanmola-Blue-LoZ-Art.png|Blue Lanmola Artwork from ''[[The Legend of Zelda]]''. | File:Lanmola-Blue-LoZ-Art.png|Blue Lanmola Artwork from [[Million Publications The Legend of Zelda Strategy Guide|Million Publications Strategy Guide]] for ''[[The Legend of Zelda]]'' | ||
File:Lanmola-Artwork-LoZ-Kodokawa-Shoten-Guide.png|Lanmola Artwork from '''Kadokawa Shoten Strategy Guide''' for ''[[The Legend of Zelda]]''. | |||
File:Lanmola-Red-LoZ-Sprite.png|Red Lanmola Sprite from ''[[The Legend of Zelda]]''. | File:Lanmola-Red-LoZ-Sprite.png|Red Lanmola Sprite from ''[[The Legend of Zelda]]''. | ||
File:Lanmola-Blue-LoZ-Sprite.png|Blue Lanmola Sprite from ''[[The Legend of Zelda]]''. | File:Lanmola-Blue-LoZ-Sprite.png|Blue Lanmola Sprite from ''[[The Legend of Zelda]]''. | ||
File:Lanmola-ALTTP-Sprite.png|Lanmola Sprite from ''[[The Legend of Zelda: A Link to the Past|A Link to the Past]]''. | File:Lanmola-ALTTP-Sprite.png|Lanmola Sprite from ''[[The Legend of Zelda: A Link to the Past|A Link to the Past]]''. | ||
File:Lanmola-LA-Artwork.png|Lanmola Artwork from ''The Legend of Zelda 4 Koma Manga Kingdom'' Volume 2. | File:Lanmola-LA-Artwork.png|Lanmola Artwork from '''The Legend of Zelda 4 Koma Manga Kingdom''' Volume 2. | ||
File:Lanmola-LA.png|Lanmola Sprite from ''[[The Legend of Zelda: Link's Awakening|Link's Awakening]]''. | File:Lanmola-LA.png|Lanmola Sprite from ''[[The Legend of Zelda: Link's Awakening|Link's Awakening]]''. | ||
</gallery> | </gallery> | ||
Revision as of 19:17, January 7, 2013
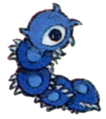
A Lanmola is a centipede-like enemy found in three games to date. These include The Legend of Zelda, A Link to the Past, and Link's Awakening. In the final two, Lanmola serves as a Boss or Mini-Boss. However, in the original The Legend of Zelda, it appears as a regular enemy.
Appearances
The Legend of Zelda
There are two types of Lanmolas found in The Legend of Zelda. One is red and the other is blue. Both types are only found in the final dungeon of the game, Death Mountain. They were created solely for this dungeon, an element that more recent Zelda installments have failed to do. The can be killed with constant Sword strikes to their head. They appear multiple times throughout the dungeon.
A Link to the Past
- Main article: Lanmola (A Link to the Past)
In A Link to the Past, the Lanmolas are the boss of the Desert Palace. However, instead of fighting one Lanmola, Link will have to fight three of them at once. The Lanmolas later appear as a Mini-Boss in Ganon's Tower.
Link's Awakening
There are only two Lanmolas in Link's Awakening, similarly to A Link to the Past. The first Lanmola is found in the Yarna Desert, guarding the Angler Key, which is needed to gain access to the fourth dungeon in the game, Angler's Tunnel. The second time is during the Final Boss battle, where the Nightmare takes a form of the Lanmola.
Battle
Gallery
Red Lanmola Artwork from Million Publications Strategy Guide for The Legend of Zelda.
Blue Lanmola Artwork from Million Publications Strategy Guide for The Legend of Zelda
Lanmola Artwork from Kadokawa Shoten Strategy Guide for The Legend of Zelda.
Red Lanmola Sprite from The Legend of Zelda.
Blue Lanmola Sprite from The Legend of Zelda.
Lanmola Sprite from A Link to the Past.
Lanmola Sprite from Link's Awakening.


