Jermafenser: Difference between revisions
Jump to navigation
Jump to search
Want an adless experience? Log in or Create an account.
No edit summary |
mNo edit summary |
||
| (7 intermediate revisions by 5 users not shown) | |||
| Line 1: | Line 1: | ||
{{Infobox|boss | {{Infobox|boss | ||
| image = [[File:Helmethead-Futabasha-AOL.png| | | image = [[File:Helmethead-Futabasha-AOL.png|220px]] | ||
| caption = Artwork from ''The Adventure of Link | | caption = Artwork from ''[[Futabasha The Adventure of Link Strategy Guide]]'' | ||
| threat = 4 | | threat = 4 | ||
| weapon = [[Sword]]<br/>[[Shield Spell]] | | weapon = [[Sword]]<br/>[[Shield Spell]] | ||
| Line 8: | Line 8: | ||
}} | }} | ||
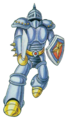
'''Jermafenser''', also known as'''Helmethead''', is the | '''Jermafenser''', also known as '''Helmethead''', is the [[boss]] of [[Midoro Palace]] in ''[[Zelda II: The Adventure of Link|The Adventure of Link]]''. | ||
== | ==''The Adventure of Link''== | ||
The strategy to defeat Jermafenser is simple and a lot like [[Mazura]]; jump and slash at its unprotected head. Once [[Link (The Legend of Zelda)#The Adventure of Link|Link]] hits its head once, its head starts to float; after another time, another head will float. Continuously hit his head and watch out for the beams he shoots at Link. | |||
===Enemy Data=== | |||
{| class="wikitable" style="float:left; text-align:center; width:500px;" | {| class="wikitable" style="float:left; text-align:center; width:500px;" | ||
|+ style="text-align:left;" | <big>Jermafenser</big> | |+ style="text-align:left;" | <big>Jermafenser</big> | ||
| rowspan="3" width="25%" |[[File:Helmethead-Sprite-AOL.png]] | | rowspan="3" width="25%" |[[File:Helmethead-Sprite-AOL.png]] | ||
| width="25%" | Experience | | width="25%" | [[Experience Point]]s || width="50%" | 200 | ||
|- | |- | ||
| Item Drop || None | | Item Drop || None | ||
| Line 52: | Line 55: | ||
==Gallery== | ==Gallery== | ||
<gallery> | <gallery> | ||
File:Helmethead-Art-AOL.png| | File:Helmethead-Art-AOL.png|Official artwork | ||
File: | File:Helmethead-Futabasha-AOL.png|Artwork from ''[[Futabasha The Adventure of Link Strategy Guide]]'' | ||
File:Helmethead-Sprite-AOL.png| | File:AoL_futami_Jermafenser.png|Artwork from ''[[Futami The Adventure of Link Strategy Guide]]'' | ||
File:Helmethead-Second.png|Jermafenser's | File:Helmethead-Sprite-AOL.png|Sprite | ||
File:Helmethead-Second.png|Jermafenser's sprite with his second helmet | |||
File:Link-Fighting-Jermafenser.png|Scene artwork of [[Link (The Legend of Zelda)#The Adventure of Link|Link]] fighting Jermafenser | |||
</gallery> | </gallery> | ||
{{ | {{Listbox|The Adventure of Link|Bosses}} | ||
{{Cat|The Adventure of Link Bosses}} | {{Cat|The Adventure of Link Bosses}} | ||
Latest revision as of 21:37, April 8, 2024
Jermafenser

Games | ||
Dungeons | ||
Threat | ||
Effective | ||
Jermafenser, also known as Helmethead, is the boss of Midoro Palace in The Adventure of Link.
The Adventure of Link
The strategy to defeat Jermafenser is simple and a lot like Mazura; jump and slash at its unprotected head. Once Link hits its head once, its head starts to float; after another time, another head will float. Continuously hit his head and watch out for the beams he shoots at Link.
Enemy Data
| Experience Points | 200 | ||||
| Item Drop | None | ||||
| Enemy Habitat | Midoro Palace | ||||
| Combat Data | |||||
Gallery

Official artwork
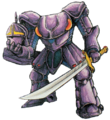
Artwork from Futabasha The Adventure of Link Strategy Guide
Artwork from Futami The Adventure of Link Strategy Guide

Sprite

Jermafenser's sprite with his second helmet
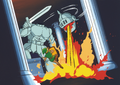
Scene artwork of Link fighting Jermafenser


