Item Shop: Difference between revisions
No edit summary |
No edit summary |
||
| Line 1: | Line 1: | ||
{{Infobox|shop | {{Infobox|shop | ||
| image = [[File:Item-Shop.png | | image = [[File:Item-Shop.png]] | ||
| caption = 2nd type of Item Shop | | caption = 2nd type of Item Shop | ||
| game = ''[[The Legend of Zelda]]'' | | game = ''[[The Legend of Zelda]]'' | ||
| Line 43: | Line 43: | ||
- From the start screen head right a screen, up two screens, and right six screens.}}<section end=2 /> | - From the start screen head right a screen, up two screens, and right six screens.}}<section end=2 /> | ||
<section begin=3 />{{Gallery/Box|file=LoZ_S_003.png|caption='''Location''': Northeast [[ | <section begin=3 />{{Gallery/Box|file=LoZ_S_003.png|caption='''Location''': Northeast [[Death Mountain#The Legend of Zelda|Death Mountain]]. | ||
'''Conditions''': None. | '''Conditions''': None. | ||
| Line 110: | Line 110: | ||
<section begin=1 />{{Gallery/Box|file=LoZ_S_008.png|caption='''Location''': One screen right of [[Level 4: The Snake]]. | <section begin=1 />{{Gallery/Box|file=LoZ_S_008.png|caption='''Location''': One screen right of [[Level 4: The Snake]]. | ||
'''Conditions''': After obtaining the [[Candle# | '''Conditions''': After obtaining the [[Candle#The Legend of Zelda|Blue Candle]] or the [[Candle#The Legend of Zelda|Red Candle]]. | ||
- From the start screen head right a screen, up three screens, and left two screens. | - From the start screen head right a screen, up three screens, and left two screens. | ||
| Line 117: | Line 117: | ||
<section begin=2 />{{Gallery/Box|file=LoZ_S_009.png|caption='''Location''': One screen southeast of [[Level 2: The Moon]]. | <section begin=2 />{{Gallery/Box|file=LoZ_S_009.png|caption='''Location''': One screen southeast of [[Level 2: The Moon]]. | ||
'''Conditions''': After obtaining the [[Candle# | '''Conditions''': After obtaining the [[Candle#The Legend of Zelda|Blue Candle]] or the [[Candle#The Legend of Zelda|Red Candle]]. | ||
- From the start screen head right a screen, up two screens, right five screens, and up a screen. | - From the start screen head right a screen, up two screens, right five screens, and up a screen. | ||
| Line 124: | Line 124: | ||
<section begin=3 />{{Gallery/Box|file=LoZ_S_010.png|caption='''Location''': One screen northwest of [[Level 1: The Eagle]]. | <section begin=3 />{{Gallery/Box|file=LoZ_S_010.png|caption='''Location''': One screen northwest of [[Level 1: The Eagle]]. | ||
'''Conditions''': After obtaining the [[Bomb | '''Conditions''': After obtaining the [[Bomb]]s. | ||
- Exit the graveyard to the right and continue right another screen. Head up along the right, then right two screens, down a screen, right a screen, and up a screen. | - Exit the graveyard to the right and continue right another screen. Head up along the right, then right two screens, down a screen, right a screen, and up a screen. | ||
| Line 131: | Line 131: | ||
<section begin=4 />{{Gallery/Box|file=LoZ_S_011.png|caption='''Location''': One screen north of [[Level 6: The Dragon]]. | <section begin=4 />{{Gallery/Box|file=LoZ_S_011.png|caption='''Location''': One screen north of [[Level 6: The Dragon]]. | ||
'''Conditions''': After obtaining the [[Bomb | '''Conditions''': After obtaining the [[Bomb]]s. | ||
- Exit the graveyard to the right and continue right another screen. Head up along the right, then right a screen, up a screen, and left two screens. | - Exit the graveyard to the right and continue right another screen. Head up along the right, then right a screen, up a screen, and left two screens. | ||
| Line 158: | Line 158: | ||
<section begin=1 />{{Gallery/Box|file=LoZ_S_012.png|caption='''Location''': One screen northwest of [[Level 4: The Snake]]. | <section begin=1 />{{Gallery/Box|file=LoZ_S_012.png|caption='''Location''': One screen northwest of [[Level 4: The Snake]]. | ||
'''Conditions''': After obtaining the [[Candle# | '''Conditions''': After obtaining the [[Candle#The Legend of Zelda|Blue Candle]] or the [[Candle#The Legend of Zelda|Red Candle]]. | ||
- From the start screen head up a screen, left three screens, and up three screens. | - From the start screen head up a screen, left three screens, and up three screens. | ||
- Touch the middle [[Armos# | - Touch the middle [[Armos#The Legend of Zelda|Armos]] statue in the top row. He will move out of the way revealing a staircase.}}<section end=1 /> | ||
{{Gallery/Bottom}} | {{Gallery/Bottom}} | ||
| Line 198: | Line 198: | ||
- From the start screen head right a screen, up two screens, and right six screens.}}<section end=2 /> | - From the start screen head right a screen, up two screens, and right six screens.}}<section end=2 /> | ||
<section begin=3 />{{Gallery/Box|file=LoZ_S_003.png|caption='''Location''': Northeast [[ | <section begin=3 />{{Gallery/Box|file=LoZ_S_003.png|caption='''Location''': Northeast [[Death Mountain#The Legend of Zelda|Death Mountain]]. | ||
'''Conditions''': None. | '''Conditions''': None. | ||
| Line 213: | Line 213: | ||
- From the start screen head up a screen, left four screens, down a screen, and right a screen.}}<section end=5 /> | - From the start screen head up a screen, left four screens, down a screen, and right a screen.}}<section end=5 /> | ||
<section begin=6 />{{Gallery/Box|file=LoZ_S_015.png|caption='''Location''': North Central [[Death Mountain# | <section begin=6 />{{Gallery/Box|file=LoZ_S_015.png|caption='''Location''': North Central [[Death Mountain#The Legend of Zelda|Death Mountain]]. | ||
'''Conditions''': After obtaining the [[Bomb | '''Conditions''': After obtaining the [[Bomb]]s. | ||
- Exit the graveyard to the right and continue right another screen. Head up along the right side, then right two screens and up a screen. | - Exit the graveyard to the right and continue right another screen. Head up along the right side, then right two screens and up a screen. | ||
| Line 246: | Line 246: | ||
- From the start screen head right eight screens and up a screen.}}<section end=1 /> | - From the start screen head right eight screens and up a screen.}}<section end=1 /> | ||
<section begin=2 />{{Gallery/Box|file=LoZ_S_005.png|caption='''Location''': One screen left of [[ | <section begin=2 />{{Gallery/Box|file=LoZ_S_005.png|caption='''Location''': One screen left of [[Level 5 (Second Quest)|Level 5]]. | ||
'''Conditions''': None. | '''Conditions''': None. | ||
| Line 281: | Line 281: | ||
{{Gallery|size=500|pad=4|align=left|margin=85}} | {{Gallery|size=500|pad=4|align=left|margin=85}} | ||
<section begin=1 />{{Gallery/Box|file=LoZ_S_008.png|caption='''Location''': One screen right of [[ | <section begin=1 />{{Gallery/Box|file=LoZ_S_008.png|caption='''Location''': One screen right of [[Level 5 (Second Quest)|Level 5]]. | ||
'''Conditions''': After obtaining the [[Candle# | '''Conditions''': After obtaining the [[Candle#The Legend of Zelda|Blue Candle]] or the [[Candle#The Legend of Zelda|Red Candle]]. | ||
- From the start screen head right a screen, up three screens, and left two screens. | - From the start screen head right a screen, up three screens, and left two screens. | ||
- Use the candle to burn to top-left tree to reveal a staircase.}}<section end=1 /> | - Use the candle to burn to top-left tree to reveal a staircase.}}<section end=1 /> | ||
<section begin=2 />{{Gallery/Box|file=LoZ_S_009.png|caption='''Location''': One screen southeast of [[ | <section begin=2 />{{Gallery/Box|file=LoZ_S_009.png|caption='''Location''': One screen southeast of [[Level 3 (Second Quest)|Level 3]]. | ||
'''Conditions''': After obtaining the [[Candle# | '''Conditions''': After obtaining the [[Candle#The Legend of Zelda|Blue Candle]] or the [[Candle#The Legend of Zelda|Red Candle]]. | ||
- From the start screen head right a screen, up two screens, right five screens, and up a screen. | - From the start screen head right a screen, up two screens, right five screens, and up a screen. | ||
- Use the candle to burn the bottom-right of the lone bushes to reveal a staircase.}}<section end=2 /> | - Use the candle to burn the bottom-right of the lone bushes to reveal a staircase.}}<section end=2 /> | ||
<section begin=3 />{{Gallery/Box|file=LoZ_S_010.png|caption='''Location''': One screen northwest of [[ | <section begin=3 />{{Gallery/Box|file=LoZ_S_010.png|caption='''Location''': One screen northwest of [[Level 1 (Second Quest)|Level 1]]. | ||
'''Conditions''': After obtaining the [[Bomb | '''Conditions''': After obtaining the [[Bomb]]s. | ||
- Exit the graveyard to the right and continue right another screen. Head up along the right, then right two screens, down a screen, right a screen, and up a screen. | - Exit the graveyard to the right and continue right another screen. Head up along the right, then right two screens, down a screen, right a screen, and up a screen. | ||
| Line 304: | Line 304: | ||
<section begin=4 />{{Gallery/Box|file=LoZ_S_011.png|caption='''Location''': Western Hyrule. | <section begin=4 />{{Gallery/Box|file=LoZ_S_011.png|caption='''Location''': Western Hyrule. | ||
'''Conditions''': After obtaining the [[Bomb | '''Conditions''': After obtaining the [[Bomb]]s. | ||
- Exit the graveyard to the right and continue right another screen. Head up along the right, then right a screen, up a screen, and left two screens. | - Exit the graveyard to the right and continue right another screen. Head up along the right, then right a screen, up a screen, and left two screens. | ||
Revision as of 11:30, April 7, 2022

2nd type of Item Shop
Games | ||
Location | ||
Owner | ||
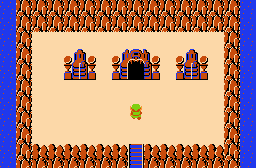
Item Shops are a type of shop from The Legend of Zelda. They are owned and operated by the Merchant, and the stuff he sells cannot be found anywhere else. The only other shop in the game is the Potion Shop, which is run by the Old Woman.
There are four different types of the Item Shop. Each type has different items from the other, or the same item but at a different price.
Locations
First Quest

Type #1
The first type of Item Shop is the second rarest shop; second to the final type. The products and wares of this type of Item Shop are shown below in a table:
| Item | Price |
|---|---|
| 160 Rupees | |
| Small Key | 100 Rupees |
| Blue Candle | 60 Rupees |
- Bolded prices are the best available in the game.
Location: One screen northwest of the start screen.
Conditions: None.
- From the start screen head left a screen and up a screen.
Location: Southeast Hyrule.
Conditions: None.
- From the start screen head right a screen, up two screens, and right six screens.
Location: Northeast Death Mountain.
Conditions: None.
- From the start screen head right a screen, up five screens, right four screens, and up two screens.


Type #2
The second type of Item Shop is a little more common than the first type, as it has four different locations. This shop also sells the Magical Shield like the first type, but has replaced the Blue Candle and the Small Key. All of its products and wares can be found below:
| Item | Price |
|---|---|
| 130 Rupees | |
| Bomb ×4 | 20 Rupees |
| Arrows | 80 Rupees |
- Bolded prices are the best available in the game.
Location: Southeast corner.
Conditions: None.
- From the start screen head right eight screens and up a screen.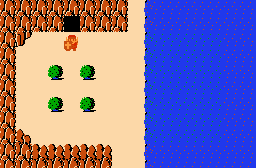
Location: One screen left of Level 4: The Snake.
Conditions: None.
- From the start screen head up a screen, left three screens, and up two screens.
Location: Central Hyrule.
Conditions: None.
- From the start screen head right a screen, up two screens, right a screen, up a screen, and right a screen.
Location: North Central Hyrule.
Conditions: None.
- Exit the graveyard to the right and continue right another screen. Head up along the right side and then right two screens.


Type #3
The third type of Item Shop is tied with the second type in terms of the most common type of shop, as this type also has four locations. The wares and products of this type of Item Shop are shown below:
| Item | Price |
|---|---|
| 90 Rupees | |
| Food | 100 Rupees |
| Recovery Heart | 10 Rupees |
- Bolded prices are the best available in the game.
Location: One screen right of Level 4: The Snake.
Conditions: After obtaining the Blue Candle or the Red Candle.
- From the start screen head right a screen, up three screens, and left two screens.
- Use the candle to burn to top-left tree to reveal a staircase.
Location: One screen southeast of Level 2: The Moon.
Conditions: After obtaining the Blue Candle or the Red Candle.
- From the start screen head right a screen, up two screens, right five screens, and up a screen.
- Use the candle to burn the bottom-right of the lone bushes to reveal a staircase.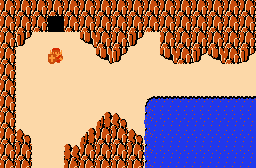
Location: One screen northwest of Level 1: The Eagle.
Conditions: After obtaining the Bombs.
- Exit the graveyard to the right and continue right another screen. Head up along the right, then right two screens, down a screen, right a screen, and up a screen.
- Place a bomb against the flat part of the rocks at the top-left of the screen to reveal a cave.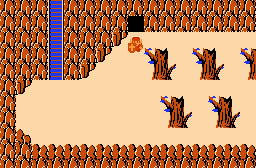
Location: One screen north of Level 6: The Dragon.
Conditions: After obtaining the Bombs.
- Exit the graveyard to the right and continue right another screen. Head up along the right, then right a screen, up a screen, and left two screens.
- Place a bomb on the far left side of the flat area of the rocks to reveal a cave.


Type #4
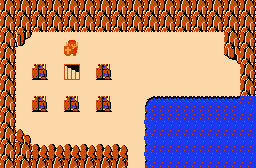
The fourth and final type of Item Shop can only be found in one location, and thus is easily the most rare. This shop is the only place Link can find the Blue Ring. Its products and wares are shown below:
| Item | Price |
|---|---|
| 80 Rupees | |
| Food | 60 Rupees |
| Blue Ring | 250 Rupees |
- Bolded prices are the best available in the game.
Location: One screen northwest of Level 4: The Snake.
Conditions: After obtaining the Blue Candle or the Red Candle.
- From the start screen head up a screen, left three screens, and up three screens.
- Touch the middle Armos statue in the top row. He will move out of the way revealing a staircase.

Second Quest

Type #1
The first type of Item Shop is the most common in the Second Quest, as it has twice as many locations compared to the First Quest. The products and wares of this type of Item Shop are shown below in a table:
| Item | Price |
|---|---|
| 160 Rupees | |
| Small Key | 100 Rupees |
| Blue Candle | 60 Rupees |
- Bolded prices are the best available in the game.
Location: One screen northwest of the start screen.
Conditions: None.
- From the start screen head left a screen and up a screen.Location: Southeast Hyrule.
Conditions: None.
- From the start screen head right a screen, up two screens, and right six screens.Location: Northeast Death Mountain.
Conditions: None.
- From the start screen head right a screen, up five screens, right four screens, and up two screens.
Location: Northeast corner.
Conditions: None.
- From the start screen head right one screen, up five screens, right five screens, up a screen, right a screen, and up a screen.
Location: South Central Hyrule.
Conditions: None.
- From the start screen head up a screen, left four screens, down a screen, and right a screen.
Location: North Central Death Mountain.
Conditions: After obtaining the Bombs.
- Exit the graveyard to the right and continue right another screen. Head up along the right side, then right two screens and up a screen.
- Place a bomb against the flat wall on the right side of the screen to reveal a cave.


Type #2
The second type of Item Shop is a little more common than the first type, as it has four different locations. This shop also sells the Magical Shield like the first type, but has replaced the Blue Candle and the Small Key. All of its products and wares can be found below:
| Item | Price |
|---|---|
| 130 Rupees | |
| Bomb ×4 | 20 Rupees |
| Arrows | 80 Rupees |
- Bolded prices are the best available in the game.
Location: Southeast corner.
Conditions: None.
- From the start screen head right eight screens and up a screen.Location: One screen left of Level 5.
Conditions: None.
- From the start screen head up a screen, left three screens, and up two screens.Location: Central Hyrule.
Conditions: None.
- From the start screen head right a screen, up two screens, right a screen, up a screen, and right a screen.Location: North Central Hyrule.
Conditions: None.
- Exit the graveyard to the right and continue right another screen. Head up along the right side and then right two screens.
Type #3
The third type of Item Shop is tied with the second type in terms of the most common type of shop, as this type also has four locations. The wares and products of this type of Item Shop are shown below:
| Item | Price |
|---|---|
| 90 Rupees | |
| Food | 100 Rupees |
| Recovery Heart | 10 Rupees |
- Bolded prices are the best available in the game.
Location: One screen right of Level 5.
Conditions: After obtaining the Blue Candle or the Red Candle.
- From the start screen head right a screen, up three screens, and left two screens.
- Use the candle to burn to top-left tree to reveal a staircase.Location: One screen southeast of Level 3.
Conditions: After obtaining the Blue Candle or the Red Candle.
- From the start screen head right a screen, up two screens, right five screens, and up a screen.
- Use the candle to burn the bottom-right of the lone bushes to reveal a staircase.Location: One screen northwest of Level 1.
Conditions: After obtaining the Bombs.
- Exit the graveyard to the right and continue right another screen. Head up along the right, then right two screens, down a screen, right a screen, and up a screen.
- Place a bomb against the flat part of the rocks at the top-left of the screen to reveal a cave.Location: Western Hyrule.
Conditions: After obtaining the Bombs.
- Exit the graveyard to the right and continue right another screen. Head up along the right, then right a screen, up a screen, and left two screens.
- Place a bomb on the far left side of the flat area of the rocks to reveal a cave.
Type #4
In the Second Quest, this Item Shop has moved to the north-easternmost screen on the overworld map, where Link can find a Secret Moblin with 100 Rupees in the First Quest. Link has to walk up an invisible staircase from the screen immediately south of this Item Shop to access it.
| Item | Price |
|---|---|
| 80 Rupees | |
| Food | 60 Rupees |
| Blue Ring | 250 Rupees |
- Bolded prices are the best available in the game.
Location: Northeast corner.
Conditions: None.
- From the start screen head right one screen, up five screens, right five screens, up one, and right two.
- There is actually a hidden stairway at the top of this screen within the rocks. Move around the top just right of the entrance to the cave here and you'll go up.
