Ice Block Cavern: Difference between revisions
Justac00lguy (talk | contribs) (Adding content and removing stub) |
mNo edit summary |
||
| (12 intermediate revisions by 5 users not shown) | |||
| Line 1: | Line 1: | ||
{{Infobox|location | {{Infobox|location | ||
| image = [[File:Blockcavern.jpg]] | |||
|image | | caption = | ||
|game | | game = ''[[The Legend of Zelda: Twilight Princess|Twilight Princess]]'' | ||
|item | | item = [[Piece of Heart]] | ||
|related = [[Lake Hylia Cavern]]<br>[[Kakariko Gorge Cavern]]<br>[[Bridge of Eldin Cavern]] | | related = [[Lake Hylia Cavern]]<br/>[[Kakariko Gorge Cavern]]<br/>[[Bridge of Eldin Cavern]] | ||
}} | }} | ||
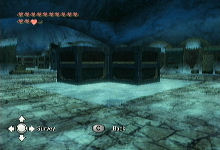
The '''Ice Block Cavern''' is a hidden cavern that can be entered in ''[[The Legend of Zelda: Twilight Princess|Twilight Princess]]''. It is found in [[North Hyrule Field]], in the northern portion of the area. In order to enter it [[Link]] needs to first obtain [[Bomb]]s as the entrance is blocked with a large boulder. Once inside, Link finds a large chunk of ice, stopping his progress through the cavern. In order to break the barrier, | The '''Ice Block Cavern''' is a hidden cavern that can be entered in ''[[The Legend of Zelda: Twilight Princess|Twilight Princess]]''. It is found in [[Hyrule Field#Twilight Princess|North Hyrule Field]], in the northern portion of the area. In order to enter it, [[Link (Twilight Princess)|Link]] needs to first obtain [[Bomb]]s as the entrance is blocked with a large boulder. Once inside, Link finds a large chunk of ice, stopping his progress through the cavern. In order to break the barrier, Link must utilize the [[Ball and Chain]], which can be found in the [[Snowpeak Ruins]]. Inside, there are three sets of puzzles, with large [[Ice Block]]s that have to be moved in a certain way to open the door to the next puzzle. | ||
== | ==Solutions== | ||
There are several different solutions to each of these puzzles. Below is just one way of completing this block puzzle. '''NOTE''' that the picture solutions are for either the Nintendo Wii version of ''Twilight Princess'' or [[Hero Mode]] in ''[[The Legend of Zelda: Twilight Princess HD|Twilight Princess HD]]''. If you are playing the [[Nintendo GameCube]] version, or the standard version of ''Twilight Princess HD'', these solutions will still work. However, the puzzle will the mirrored. The text is written so that it will work for any version. | |||
==Puzzle # | ===Puzzle #1=== | ||
{{Gallery|size=112|pad=5|margin=0}} | |||
{{Gallery/Box|file=Block-Puzzle-1-Step-1.png}} | |||
{{Gallery/Box|file=Block-Puzzle-1-Step-2-3.png}} | |||
{{Gallery/Box|file=Block-Puzzle-1-Step-4-6.png}} | |||
{{Gallery/Box|file=Block-Puzzle-1-Step-7.png}} | |||
{{Gallery/Box|file=Block-Puzzle-1-Step-8-9.png}} | |||
{{Gallery/Box|file=Block-Puzzle-1-Animated.gif}} | |||
{{Gallery/Bottom}}</onlyinclude> | |||
*Push the corner block north, so it snaps against the other. | |||
*Push the remaining lower block to the side and up, so it snaps against the others, forming a column of three. | |||
*Push the block that is in the corner, to the side, down, and to the side, so that it is in the corner, beneath the other two blocks. | |||
*Push the middle block across the switch and it will stop on the opposite side. | |||
*Push the lower block up and then onto the switch. | |||
===Puzzle #2=== | |||
{{Gallery|size=96|pad=5|margin=0}} | |||
{{Gallery/Box|file=Block-Puzzle-2-Step-1.png}} | |||
{{Gallery/Box|file=Block-Puzzle-2-Step-2-3.png}} | |||
{{Gallery/Box|file=Block-Puzzle-2-Step-4-5.png}} | |||
{{Gallery/Box|file=Block-Puzzle-2-Step-6.png}} | |||
{{Gallery/Box|file=Block-Puzzle-2-Step-7-8.png}} | |||
{{Gallery/Box|file=Block-Puzzle-2-Step-9-10.png}} | |||
{{Gallery/Box|file=Block-Puzzle-2-Step-11.png}} | |||
{{Gallery/Box|file=Block-Puzzle-2-Step-12.png}} | |||
{{Gallery/Box|file=Block-Puzzle-2-Step-13.png}} | |||
{{Gallery/Box|file=Block-Puzzle-2-Animated.gif}} | |||
{{Gallery/Bottom}}</onlyinclude> | |||
*Push the outer block up towards the indent in the corner. | |||
*Push the lower corner block to the side and then up, making a column of two. | |||
*Push the final block down and over, to make a column of three. | |||
*Push the middle across to the other side. | |||
*Push the lower block up and then over, so that it lands on the floor switch. | |||
*Push the lower of the two remaining blocks down and then over. | |||
*Push the higher block across the ice and it will glide over the switch. | |||
*Push the lower block up against the indent in the corner. | |||
*Push the other block onto the floor switch. | |||
===Puzzle #3=== | |||
{{Gallery|size=112|pad=5|margin=0}} | |||
{{Gallery/Box|file=Block-Puzzle-3-Step-1.png}} | |||
{{Gallery/Box|file=Block-Puzzle-3-Step-2-3.png}} | |||
{{Gallery/Box|file=Block-Puzzle-3-Step-4-6.png}} | |||
{{Gallery/Box|file=Block-Puzzle-3-Step-7.png}} | |||
{{Gallery/Box|file=Block-Puzzle-3-Step-8-9.png}} | |||
{{Gallery/Box|file=Block-Puzzle-3-Step-10-13.png}} | |||
{{Gallery/Box|file=Block-Puzzle-3-Animated.gif}} | |||
{{Gallery/Bottom}}</onlyinclude> | |||
*Push the corner block north, so it snaps against the other. | |||
*Push the remaining lower block to the side and up, so it snaps against the others, forming a column of three. | |||
*Push the block that is in the corner, to the side, down, and to the side, so that it is in the corner, beneath the other two blocks. | |||
*Push the middle block across the switch and it will stop on the opposite side. | |||
*Push the corner block up and over, so that it slides over the switch and hits the other block. | |||
*Push the lower of the two outer blocks down, to the side, up, and then on top of the switch. | |||
{{Listbox|Twilight Princess Locations}} | |||
{{Cat|Twilight Princess Locations}} | {{Cat|Twilight Princess Locations}} | ||
{{cat|Guides}} | |||
Revision as of 15:34, March 13, 2023
The Ice Block Cavern is a hidden cavern that can be entered in Twilight Princess. It is found in North Hyrule Field, in the northern portion of the area. In order to enter it, Link needs to first obtain Bombs as the entrance is blocked with a large boulder. Once inside, Link finds a large chunk of ice, stopping his progress through the cavern. In order to break the barrier, Link must utilize the Ball and Chain, which can be found in the Snowpeak Ruins. Inside, there are three sets of puzzles, with large Ice Blocks that have to be moved in a certain way to open the door to the next puzzle.
Solutions
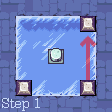
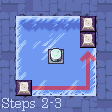
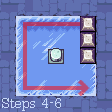
There are several different solutions to each of these puzzles. Below is just one way of completing this block puzzle. NOTE that the picture solutions are for either the Nintendo Wii version of Twilight Princess or Hero Mode in Twilight Princess HD. If you are playing the Nintendo GameCube version, or the standard version of Twilight Princess HD, these solutions will still work. However, the puzzle will the mirrored. The text is written so that it will work for any version.
Puzzle #1
- Push the corner block north, so it snaps against the other.
- Push the remaining lower block to the side and up, so it snaps against the others, forming a column of three.
- Push the block that is in the corner, to the side, down, and to the side, so that it is in the corner, beneath the other two blocks.
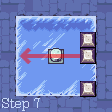
- Push the middle block across the switch and it will stop on the opposite side.
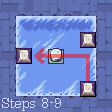
- Push the lower block up and then onto the switch.
Puzzle #2
- Push the outer block up towards the indent in the corner.
- Push the lower corner block to the side and then up, making a column of two.
- Push the final block down and over, to make a column of three.
- Push the middle across to the other side.
- Push the lower block up and then over, so that it lands on the floor switch.
- Push the lower of the two remaining blocks down and then over.
- Push the higher block across the ice and it will glide over the switch.
- Push the lower block up against the indent in the corner.
- Push the other block onto the floor switch.
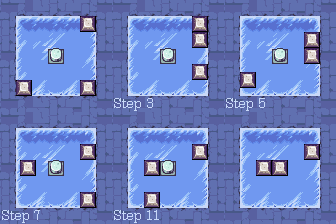
Puzzle #3
- Push the corner block north, so it snaps against the other.
- Push the remaining lower block to the side and up, so it snaps against the others, forming a column of three.
- Push the block that is in the corner, to the side, down, and to the side, so that it is in the corner, beneath the other two blocks.
- Push the middle block across the switch and it will stop on the opposite side.
- Push the corner block up and over, so that it slides over the switch and hits the other block.
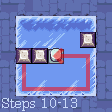
- Push the lower of the two outer blocks down, to the side, up, and then on top of the switch.


