Gohma: Difference between revisions
m (Text replacement - "{{MagicNavbox\|Link's Awakening\|(.*)}}" to "{{Listbox|Link's Awakening|$1}}") Tags: Mobile edit Mobile web edit |
No edit summary |
||
| Line 4: | Line 4: | ||
| threat = 2 | | threat = 2 | ||
| attack = <u>'''''The Legend of Zelda'''''</u><br/>{{H|1}} Contact<br/>{{H|1}} Fireball<br/><u>'''''Link's Awakening'''''</u><br/>{{H|0.5}} Beam<br/>{{H|1}} Contact<br/><u>'''''Oracle of Seasons'''''</u> | | attack = <u>'''''The Legend of Zelda'''''</u><br/>{{H|1}} Contact<br/>{{H|1}} Fireball<br/><u>'''''Link's Awakening'''''</u><br/>{{H|0.5}} Beam<br/>{{H|1}} Contact<br/><u>'''''Oracle of Seasons'''''</u> | ||
| game = ''[[The Legend of Zelda]]''<br/>''[[The Legend of Zelda: Link's Awakening|Link's Awakening]]''<br/>''[[The Legend of Zelda: Ocarina of Time|Ocarina of Time]]''<br/>''[[The Legend of Zelda: Oracle of Seasons|Oracle of Seasons]]''<br/>''[[The Legend of Zelda: The Wind Waker|The Wind Waker]]''<br/>''[[The Legend of Zelda: Twilight Princess|Twilight Princess]]'' | | game = ''[[The Legend of Zelda]]''<br/>''[[The Legend of Zelda: Link's Awakening|Link's Awakening]]''<br/>''[[The Legend of Zelda: Ocarina of Time|Ocarina of Time]]''<br/>''[[The Legend of Zelda: Oracle of Seasons|Oracle of Seasons]]''<br/>''[[The Legend of Zelda: The Wind Waker|The Wind Waker]]''<br/>''[[The Legend of Zelda: Twilight Princess|Twilight Princess]]''<br/>''[[Link: The Faces of Evil|The Faces of Evil]]''<br/>''[[Zelda: The Wand of Gamelon|The Wand of Gamelon]]'' | ||
| dungeon = [[Level 6: The Dragon]]<br/>[[Level 8: The Lion]]<br/>[[Catfish's Maw]]<br/>[[Inside the Deku Tree]]<br/>[[Dancing Dragon Dungeon]]<br/>[[Temple of Time (Dungeon)|Temple of Time]] | | dungeon = [[Level 6: The Dragon]]<br/>[[Level 8: The Lion]]<br/>[[Catfish's Maw]]<br/>[[Inside the Deku Tree]]<br/>[[Dancing Dragon Dungeon]]<br/>[[Temple of Time (Dungeon)|Temple of Time]] | ||
| weapon = <u>'''''General'''''</u><br/>[[Bow]] & [[Arrow]]<br/>[[Hookshot]]<br/>[[Fairy Slingshot]]<br/>[[Deku Stick]]<br/>[[Deku Nut]]<br/>[[Sword]]<br/>[[Dominion Rod]]<br/><u>'''''Link's Awakening'''''</u><br/>[[Bow]] - 3 hits<br/>[[Hookshot|Hook Shot]] - 6 hits | | weapon = <u>'''''General'''''</u><br/>[[Bow]] & [[Arrow]]<br/>[[Hookshot]]<br/>[[Fairy Slingshot]]<br/>[[Deku Stick]]<br/>[[Deku Nut]]<br/>[[Sword]]<br/>[[Dominion Rod]]<br/><u>'''''Link's Awakening'''''</u><br/>[[Bow]] - 3 hits<br/>[[Hookshot|Hook Shot]] - 6 hits | ||
| Line 41: | Line 41: | ||
{{Main|Gohma (Hyrule Warriors)}} | {{Main|Gohma (Hyrule Warriors)}} | ||
Gohma also appears as a boss in ''[[Hyrule Warriors]]''. | Gohma also appears as a boss in ''[[Hyrule Warriors]]''. | ||
===Link: The Faces of Evil=== | |||
Gohma appear in the same fashion as they do in ''[[Zelda: The Wand of Gamelon|The Wand of Gamelon]]''. | |||
===Zelda: The Wand of Gamelon=== | |||
Gohma appear as enemies in the [[Ahitaru]] stage. They are fairly large, orange creatures with four legs and a massive eye. They will pace around on the ground, trying to walk right into Zelda. Gohma aren't overly powerful, but they are very sturdy, and will take a number of sword slashes to defeat. The more efficient way is to toss a single bomb at a Gohma, as it will defeat it in one hit. Gohma will always leave behind a blue ruby, worth 10 rubies, so even using a single expensive bomb is worth it to defeat one of them. | |||
==Trivia== | ==Trivia== | ||
| Line 54: | Line 60: | ||
File:ArmoGhoma.png|''Armogohma from Twilight Princess'' | File:ArmoGhoma.png|''Armogohma from Twilight Princess'' | ||
File:Gohma-OoS.png|''Gohma from Oracle of Seasons'' | File:Gohma-OoS.png|''Gohma from Oracle of Seasons'' | ||
File:Gohma-CDI.png|''Gohma from Faces of Evil and Wand of Gamelon'' | |||
</gallery> | </gallery> | ||
Revision as of 23:33, April 18, 2021

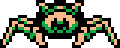
Artwork of Gohma from The Legend of Zelda
Games | ||
Dungeons | ||
Rewards | ||
Threat | ||
Attacks | The Legend of Zelda | |
Effective | General | |
Gohma is a recurring Boss in The Legend of Zelda series. It usually appears as a spider-like creature with one eye, which is its weakspot.
Appearances
The Legend of Zelda
- Main article: Gohma (The Legend of Zelda)
In The Legend of Zelda, Gohma first appears as the boss of the sixth dungeon, Level 6: The Dragon, guarding the sixth Triforce Shard. Gohma later appears as the mini-boss of the eighth dungeon, Level 8: The Lion.
Link's Awakening
In Link's Awakening, Gohma is the mini-boss of the fifth dungeon, Catfish's Maw. Arrows and the Hookshot are effective, although arrows are most effective.
Ocarina of Time
- Main article: Queen Gohma

|
Gohma |
|---|
In Ocarina of Time, Link encounters a Gohma called Parasitic Armored Arachnid, Queen Gohma. Queen Gohma is the boss of the first dungeon, Inside the Deku Tree.
Oracle of Seasons
- Main article: Gohma (Oracle of Seasons)
In Oracle of Seasons, Gohma is the boss of the fourth dungeon, Dancing Dragon Dungeon.
The Wind Waker
- Main article: Gohma (The Wind Waker)
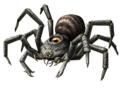
In The Wind Waker, Gohma is more scorpion-like than spider-like. It is the boss of Dragon Roost Cavern, and is defeated using the Grappling Hook.
Twilight Princess
- Main article: Armogohma
In Twilight Princess, Gohma is called Armogohma. It is a very large spider that is the boss of the sixth dungeon, Temple of Time.
Non-Canon Apperances
Hyrule Warriors
- Main article: Gohma (Hyrule Warriors)
Gohma also appears as a boss in Hyrule Warriors.
Link: The Faces of Evil
Gohma appear in the same fashion as they do in The Wand of Gamelon.
Zelda: The Wand of Gamelon
Gohma appear as enemies in the Ahitaru stage. They are fairly large, orange creatures with four legs and a massive eye. They will pace around on the ground, trying to walk right into Zelda. Gohma aren't overly powerful, but they are very sturdy, and will take a number of sword slashes to defeat. The more efficient way is to toss a single bomb at a Gohma, as it will defeat it in one hit. Gohma will always leave behind a blue ruby, worth 10 rubies, so even using a single expensive bomb is worth it to defeat one of them.
Trivia
- The Mini-Boss, Wart, from Majora's Mask, has a similar opening to Queen Gohma.
Gallery

Gohma Official Artwork from The Legend of Zelda

Blue Gohma Million Publications Artwork from The Legend of Zelda

Red Gohma Sprite from The Legend of Zelda
Gohma Sprite from Link's Awakening

Queen Gohma from Ocarina of Time
Armogohma from Twilight Princess

Gohma from Oracle of Seasons
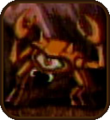
Gohma from Faces of Evil and Wand of Gamelon


