Gleeok (The Legend of Zelda): Difference between revisions
mNo edit summary |
mNo edit summary |
||
| Line 1: | Line 1: | ||
{{Infobox|boss | {{Infobox|boss | ||
| name = Gleeok | | name = Gleeok | ||
| image = [[File:Gleeokloz.png|200px]] | | image = [[File:Gleeokloz.png|200px]] | ||
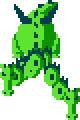
| caption = Official Artwork of Gleeok | |||
| threat = 8 | | threat = 8 | ||
| attack = {{H|1}} Contact<br>{{H|1}} Fireball | | attack = {{H|1}} Contact<br>{{H|1}} Fireball | ||
| Line 10: | Line 11: | ||
}} | }} | ||
'''Gleeok''' is the fourth [[boss]] in ''[[The Legend of Zelda]]''. Gleeok is first encountered in [[Level 4: The Snake]], where it is the guardian of the fourth Triforce Shard. Two dungeons later, in [[Level 6: The Dragon]], Gleeok again appears, but this time as the [[Mini-Boss]]. Gleeok appears for the third and final time in [[Level 8: The Lion]], as the boss. | '''Gleeok''' is the fourth [[boss]] in ''[[The Legend of Zelda]]''. Gleeok is first encountered in [[Level 4: The Snake]], where it is the guardian of the fourth [[Triforce Shard]]. Two dungeons later, in [[Level 6: The Dragon]], Gleeok again appears, but this time as the [[Mini-Boss]]. Gleeok appears for the third and final time in [[Level 8: The Lion]], as the boss. | ||
==Level 4: The Snake== | ==Level 4: The Snake== | ||
Gleeok first appears as the boss guarding the fourth [[Triforce Shard]] in Level 4: The Snake. This variation of Gleeok has two heads. The only way to kill Gleeok is to destroy each of its heads, in this case two. Link can use either use his [[Sword]] or the [[Magical Rod]] to destroy Gleeok's heads. Once one head is destroyed, it | Gleeok first appears as the boss guarding the fourth [[Triforce Shard]] in Level 4: The Snake.{{Ref|pg. 87|The Gleeok that you have beat on Level 4 is back again in room I, only now he has 3 heads and he's a lot more powerful!|''The Legend of Zelda Tips & Tactics Strategy Guide''}} This variation of Gleeok has two heads. The only way to kill Gleeok is to destroy each of its heads, in this case two. Link can use either use his [[Sword]] or the [[Magical Rod]] to destroy Gleeok's heads. Once one head is destroyed, it turns into a red, ghostly version of the head and then floats around the room to try to hurt Link.{{Ref|pg. 27|Gleeok shoots a beam, and even if you cut off its head, the head itself will attack you as it flies.|''The Legend of Zelda Tips & Tactics Strategy Guide''}}{{Ref|pg. 77|Although the heads can attack Link even after being separated from Gleeok's body, just take the damage and attack.|''The Legend of Zelda Tips & Tactics Strategy Guide''}} Another caution for Link is that Gleeok's fireballs cannot be blocked by the [[Magical Shield]]. After [[Link]] has destroyed each head, Gleeok will be defeated and Link will have the opportunity to obtain the Triforce Shard. | ||
==Level 6: The Dragon== | ==Level 6: The Dragon== | ||
| Line 22: | Line 23: | ||
==Trivia== | ==Trivia== | ||
*The | *In the [[BS The Legend of Zelda|Broadcast Satellaview]] remake of ''[[The Legend of Zelda]]'', [[Gleeok (The Legend of Zelda)|Gleeok]] is the only boss to not appear. | ||
*Within the coding of ''[[The Legend of Zelda]]'', [[Gleeok (The Legend of Zelda)|Gleeok]] has an unused sprite for an one-headed enemy.{{Ref|Unused Enemy Values|'''42''' - Gleeok with one head.|[http://tcrf.net/The_Legend_of_Zelda#Unused_Enemy_Values The Cutting Room Floor]}} | |||
==Gallery== | ==Gallery== | ||
<gallery> | <gallery> | ||
File:Gleeok-LoZ-Art-2.png|Artwork from [[Million Publications The Legend of Zelda Strategy Guide|Million Publications Strategy Guide | File:Gleeok-LoZ-Sprite.png|''Sprite of the two-headed Gleeok'' | ||
File:Gleeok-Artwork-LoZ-Kodokawa-Shoten-Guide.png|Artwork from | File:2108762.gif|''Gleeok In-Game'' | ||
File:Gleeok-LoZ-Art-2.png|''Artwork of Gleeok from [[Million Publications The Legend of Zelda Strategy Guide|Million Publications Strategy Guide]]'' | |||
File:Gleeok-Artwork-LoZ-Kodokawa-Shoten-Guide.png|''Artwork of Gleeok from Kadokawa Shoten Strategy Guide'' | |||
</gallery> | </gallery> | ||
{{References}} | |||
{{MagicNavbox|The Legend of Zelda|Bosses}} | {{MagicNavbox|The Legend of Zelda|Bosses}} | ||
Revision as of 18:26, February 15, 2014

Official Artwork of Gleeok
Games | ||
Dungeons | ||
Rewards | ||
Threat | ||
Attacks |
| |
Effective | ||
Gleeok is the fourth boss in The Legend of Zelda. Gleeok is first encountered in Level 4: The Snake, where it is the guardian of the fourth Triforce Shard. Two dungeons later, in Level 6: The Dragon, Gleeok again appears, but this time as the Mini-Boss. Gleeok appears for the third and final time in Level 8: The Lion, as the boss.
Level 4: The Snake
Gleeok first appears as the boss guarding the fourth Triforce Shard in Level 4: The Snake.[1] This variation of Gleeok has two heads. The only way to kill Gleeok is to destroy each of its heads, in this case two. Link can use either use his Sword or the Magical Rod to destroy Gleeok's heads. Once one head is destroyed, it turns into a red, ghostly version of the head and then floats around the room to try to hurt Link.[2][3] Another caution for Link is that Gleeok's fireballs cannot be blocked by the Magical Shield. After Link has destroyed each head, Gleeok will be defeated and Link will have the opportunity to obtain the Triforce Shard.
Level 6: The Dragon
Gleeok makes its second appearance in Level 6: The Dragon. This time, Gleeok is the mini-boss of the dungeon, not the boss. This battle is exactly the same as the previous one, the only difference being that this variation has three heads instead of two, making it slightly more difficult. After Link has defeated Gleeok, he can continue traveling through the dungeon.
Level 8: The Lion
Gleeok makes its third and final appearance in Level 8: The Lion. This time, Gleeok is again the boss of the dungeon, and is also again guarding a Triforce Shard. This battle is much harder than the previous two, as now Gleeok has four heads that must be killed to order for Link to claim victory. After killing Gleeok, the path to the final Triforce Shard opens up.
Trivia
- In the Broadcast Satellaview remake of The Legend of Zelda, Gleeok is the only boss to not appear.
- Within the coding of The Legend of Zelda, Gleeok has an unused sprite for an one-headed enemy.[4]
Gallery
Sprite of the two-headed Gleeok
- 2108762.gif
Gleeok In-Game
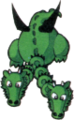
Artwork of Gleeok from Million Publications Strategy Guide
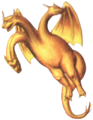
Artwork of Gleeok from Kadokawa Shoten Strategy Guide


References
- ↑ "The Gleeok that you have beat on Level 4 is back again in room I, only now he has 3 heads and he's a lot more powerful!" — The Legend of Zelda Tips & Tactics Strategy Guide, pg. 87
- ↑ "Gleeok shoots a beam, and even if you cut off its head, the head itself will attack you as it flies." — The Legend of Zelda Tips & Tactics Strategy Guide, pg. 27
- ↑ "Although the heads can attack Link even after being separated from Gleeok's body, just take the damage and attack." — The Legend of Zelda Tips & Tactics Strategy Guide, pg. 77
- ↑ "42 - Gleeok with one head." — The Cutting Room Floor, Unused Enemy Values