Aquamentus (The Legend of Zelda): Difference between revisions
mNo edit summary |
(Decided to create two sub-headings. Better organization that way I think) |
||
| Line 1: | Line 1: | ||
{{Infobox|boss | {{Infobox|boss | ||
| name = Aquamentus | | name = Aquamentus | ||
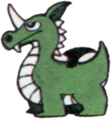
| image = [[File:Aquamentus-LoZ-Art.png|200px]] | | image = [[File:Aquamentus-LoZ-Art.png|200px]] | ||
| caption = Official Artwork from Game Manual | |||
| threat = 3 | | threat = 3 | ||
| attack = {{H|0.5}} Contact<br>{{H|0.5}} Fireball | | attack = {{H|0.5}} Contact<br>{{H|0.5}} Fireball | ||
| Line 10: | Line 11: | ||
}} | }} | ||
'''Aquamentus''' is the first [[Boss]] in ''[[The Legend of Zelda]]''. It is encountered in [[Level 1: The Eagle]] and [[Level 7: The Demon]] as the final boss of both dungeons. It is a creature that appears to be a mix of a unicorn and a dragon | '''Aquamentus''' is the first [[Boss]] in ''[[The Legend of Zelda]]''. It is encountered in [[Level 1: The Eagle]] and [[Level 7: The Demon]] as the final boss of both dungeons. It is a creature that appears to be a mix of a unicorn and a dragon, as it has a horn on its head (unicorn) and it spits out fire and has wings (dragon). | ||
==Level 1: The Eagle== | ==First Quest== | ||
Aquamentus is first | ===Level 1: The Eagle=== | ||
Aquamentus is first encountered as the final boss of Level 1: The Eagle. It is there guarding the first [[Triforce Shard]], which [[Link]] needs in order to reconstruct the [[Triforce of Wisdom]]. Aquamentus' main attack is to shoot three fireballs at Link at once, each going in a different direction. If one of these hits Link, it causes half a heart of damage. Also, making contact with Aquamentus results in Link losing half a heart of health. The best method of attack against Aquamentus is to avoid the fireballs and attack its body when it's not shooting fireballs. At this stage of the game, it is possible to already have the [[White Sword]], which kills Aqaumentus in three hits. If Link has not collected the White Sword yet, the original [[Sword]] does just fine, killing Aquamentus is six hits. [[Bomb]]s can also be used, as well as the [[Bow]] & [[Arrow]]. | |||
==Level 7: The Demon== | ===Level 7: The Demon=== | ||
In Level 7: The Demon, Aquamentus makes its second appearance as the guardian of the seventh Triforce Shard. Interestingly, this version of Aquamentus is the exact same as the previous version, meaning all of its attacks damage the same, and it requires the same amount of damage to defeat. If Link has collected the [[Magical Sword]] at this point, which is more than | In Level 7: The Demon, Aquamentus makes its second appearance as the guardian of the seventh Triforce Shard. Interestingly, this version of Aquamentus is the exact same as the previous version, meaning all of its attacks damage the same, and it requires the same amount of damage to defeat. If Link has collected the [[Magical Sword]] at this point, which is more than possible, he is able to kill Aquamentus with only two hits. After Link has defeated Aquamentus, he can collect the Triforce Shard, and continue his quest. | ||
==Level 1 | ==Second Quest== | ||
In the Second Quest, Aquamentus is again the final boss of Level 1. It behaves the same way as in the First Quest. However, the path to it is more dangerous this time around, and it is less likely that Link | ===Level 1=== | ||
In the Second Quest, Aquamentus is again the final boss of [[Level 1 (Second Quest)|Level 1]]. It behaves the exact same way as in the First Quest. However, the path to it is more dangerous this time around, and it is less likely that Link has the White Sword, Bow, or Blue Ring when facing it in this dungeon, meaning it may pose a bit more of a challenge. | |||
==Level 4 | ===Level 4=== | ||
In Level 4, Aquamentus is in an optional room of the dungeon, guarding the room holding the [[Book of Magic]] and an alternate path to | In [[Level 4 (Second Quest)|Level 4]], Aquamentus is found in an optional room of the dungeon, guarding the room holding the [[Book of Magic]] and an alternate path to an [[Old Man]] location where Link can purchase an increase to his maximum bomb capacity. | ||
==Level 8 | ===Level 8=== | ||
Aquamentus is found for the last time in the penultimate dungeon of the Second Quest. It is again in an optional room, only accessible by Link bombing his way south near the end of the level. As it appears so late in the game, Link should have enough items and hearts to effortlessly defeat it, unlocking a path towards another Old Man selling bombs. | Aquamentus is found for the last time in the penultimate dungeon of the Second Quest, [[Level 8 (Second Quest)|Level 8]]. It is again in an optional room, only accessible by Link bombing his way south near the end of the level. As it appears so late in the game, Link should have enough items and hearts to effortlessly defeat it, unlocking a path towards another Old Man selling bombs. | ||
==Trivia== | ==Trivia== | ||
*The two different appearances of [[Aquamentus (The Legend of Zelda)|Aquamentus]] in the First Quest of ''[[The Legend of Zelda]]'' have the exact same attack power and amount of damage required to defeat, even though they appear on different ends of the game, in the [[Level 1: The Eagle|first]] and the [[Level 7: The Demon|seventh | *The two different appearances of [[Aquamentus (The Legend of Zelda)|Aquamentus]] in the First Quest of ''[[The Legend of Zelda]]'' have the exact same attack power and amount of damage required to defeat, even though they appear on different ends of the game, in the [[Level 1: The Eagle|first]] and the [[Level 7: The Demon|seventh]] dungeon, respectively. | ||
*[[Aquamentus (The Legend of Zelda)|Aquamentus]] appears to be a mix of a unicorn and a dragon. It has a horn on its head, breathes fire, and has wings. | *[[Aquamentus (The Legend of Zelda)|Aquamentus]] appears to be a mix of a unicorn and a dragon. It has a horn on its head, breathes fire, and has wings. | ||
Revision as of 01:45, December 11, 2014

Official Artwork from Game Manual
Games | ||
Dungeons | ||
Rewards | ||
Threat | ||
Attacks |
| |
Effective | ||
Aquamentus is the first Boss in The Legend of Zelda. It is encountered in Level 1: The Eagle and Level 7: The Demon as the final boss of both dungeons. It is a creature that appears to be a mix of a unicorn and a dragon, as it has a horn on its head (unicorn) and it spits out fire and has wings (dragon).
First Quest
Level 1: The Eagle
Aquamentus is first encountered as the final boss of Level 1: The Eagle. It is there guarding the first Triforce Shard, which Link needs in order to reconstruct the Triforce of Wisdom. Aquamentus' main attack is to shoot three fireballs at Link at once, each going in a different direction. If one of these hits Link, it causes half a heart of damage. Also, making contact with Aquamentus results in Link losing half a heart of health. The best method of attack against Aquamentus is to avoid the fireballs and attack its body when it's not shooting fireballs. At this stage of the game, it is possible to already have the White Sword, which kills Aqaumentus in three hits. If Link has not collected the White Sword yet, the original Sword does just fine, killing Aquamentus is six hits. Bombs can also be used, as well as the Bow & Arrow.
Level 7: The Demon
In Level 7: The Demon, Aquamentus makes its second appearance as the guardian of the seventh Triforce Shard. Interestingly, this version of Aquamentus is the exact same as the previous version, meaning all of its attacks damage the same, and it requires the same amount of damage to defeat. If Link has collected the Magical Sword at this point, which is more than possible, he is able to kill Aquamentus with only two hits. After Link has defeated Aquamentus, he can collect the Triforce Shard, and continue his quest.
Second Quest
Level 1
In the Second Quest, Aquamentus is again the final boss of Level 1. It behaves the exact same way as in the First Quest. However, the path to it is more dangerous this time around, and it is less likely that Link has the White Sword, Bow, or Blue Ring when facing it in this dungeon, meaning it may pose a bit more of a challenge.
Level 4
In Level 4, Aquamentus is found in an optional room of the dungeon, guarding the room holding the Book of Magic and an alternate path to an Old Man location where Link can purchase an increase to his maximum bomb capacity.
Level 8
Aquamentus is found for the last time in the penultimate dungeon of the Second Quest, Level 8. It is again in an optional room, only accessible by Link bombing his way south near the end of the level. As it appears so late in the game, Link should have enough items and hearts to effortlessly defeat it, unlocking a path towards another Old Man selling bombs.
Trivia
- The two different appearances of Aquamentus in the First Quest of The Legend of Zelda have the exact same attack power and amount of damage required to defeat, even though they appear on different ends of the game, in the first and the seventh dungeon, respectively.
- Aquamentus appears to be a mix of a unicorn and a dragon. It has a horn on its head, breathes fire, and has wings.
See Also
- Aquamentus also makes an appearance in Oracle of Seasons.
Gallery
Artwork from Million Publications Strategy Guide for The Legend of Zelda
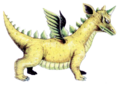
Artwork from Dai Nippon Printing Strategy Guide for The Legend of Zelda

Artwork from Kadokawa Shoten Strategy Guide for The Legend of Zelda

Sprite from The Legend of Zelda


