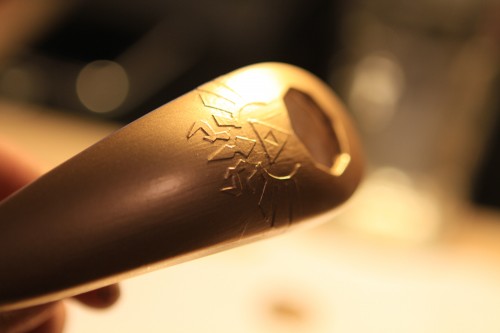
Build your own Hyrule Crest Golden Nunchuck
Posted on January 25 2012 by Mases Hagopian
 Last month we reported on a Golden Nunchuck that has become a Club Nintendo reward over in Japan. Unfortunately at this point in time there is no way for us in the west to get our hands on this nunchuck, other than paying the high importing fees. However, fans have been taking it upon themselves to create their own golden nunchucks. Most recently, a Zelda Dungeon fan has created a sweet golden nunchuck with a Hylian Crest on it. You can see the image to the left, but go ahead and make the jump to see the long process filled with plenty of images.
1. Open the Nunchuck
Loosen the screws with a triwing-screwdriver.

Open the Nunchuck at the cable-end and nudge it open with a screwdriver (Nothing can break here, but being careful with the pressure never hurts)

Take all parts out, carefully pull out the cable.

2. Hyrule Crest
Print Hyrule Crest (Click me, I’m a PDF trapped in the body of a Link)
Put insulation-tape on a non-sticking cutting board. Tape the printed out crest over it.
Carefully cut the crest into the insulation-tape.

Remove the insulation-tape.

Put the individual pieces of the crest on the nunchuck

3. Apply Color
Sand the Nunchuck with 1200 grit sandpaper.

Apply a layer golden paint (In Germany: Revell Modellack #94 – consult your local model building store) . (Airbrush vs. Pinsel comparison at the end)

Let the color dry approx. 4h between each layer!!
With a brush:
Apply one layer colorless varnish (matte) (Revell Modellack #2 MATT) auftragen.
Why?: If you remove the crest and paint over it with colorless varnish, the golden layer will smudge.
If you are using airbrush, this layer of colorless varnish is not needed.

Remove crest.
If you applied a layer colorless varnish, you might want to cut along the lines of the crest, so that no color is peeled of when removing the crest.

Carefully remove the crest with a scalpel.

Now 1-2 layers of colorless varnish. I used matte colorless varnish. You can use glossy varnish if you want.

Let the color dry approx. 4h between each layer!!
4. Finished Nunchuck
With a Brush:

With an Airbrush

To make the nun chuck more resistant against scratches you might want to put 1 or 2 component clear varnish (usually used for cars).
I personally don’t have the proper equipment to build something like this, but this is excellent. Heck, I think this custom made Hyrule Crest nunchuck is better than the actual Club Nintendo one. Is this something that you would want to make? Have you ever made any such custom Zelda goodies? Let us know by posting in the comments below.
Special thanks to Stephan for contributing this to Zelda Dungeon.
~~~Recent Content Updates~~~
- Skyward Sword Bosses
- Skyward Sword Bottles
- Skyward Sword Bugs
- Skyward Sword Characters
- Skyward Sword Enemies
- Skyward Sword Equipment
- Skyward Sword Goddess Cubes
- Skyward Sword Gratitude Crystals
- Skyward Sword Items
- Skyward Sword Official Artwork
- Skyward Sword Pieces of Heart
- Skyward Sword Screenshots
- Skyward Sword Story
- Skyward Sword Treasure
- Skyward Sword Upgrades
- Skyward Sword Video Walkthrough
- Skyward Sword Walkthrough
~~~Recent Wiki Articles~~~


