Heedle

Games | ||
Dungeons | ||
Threat | ||
Attacks | Normal Mode | |
Effective | ||
Two Heedles appear as the Mini-Bosses of the House of Gales in A Link Between Worlds. They appear as large, salamander-like monsters, whose hides are engulfed in magma.[1]
Battle
When Link enters the room in which the Heedles lie, he finds them standing side by side in the middle of the room. After noticing Link, they engulf their bodies in fire, and start to walk around aimlessly. They leave a fire trail behind them,[2] which deals half a heart of damage (two hearts in Hero Mode) if touched. In this fiery state, the Heedles are invincible. Fortunately, Link can use the Tornado Rod to extinguish their flames.[3] In their fire-less state, the Heedles are vulnerable to attacks from multiple items, including Link's Captain's Sword and the Bow.[4] After a decent number of hits, the Heedles are defeated, allowing Link access to portal which leads back to the entrance, as well as a way forward in the dungeon.
Gallery

Link attacking a Heedle
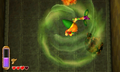
Link extinguishing a Heedle's flames


References
- ↑ "Heedles are large monsters whose hides burn with red-hot magma." — Prima Games A Link Between Worlds Strategy Guide, pg. 122
- ↑ "Heedles also leave a trail of flame behind them wherever they go, making them dangerous enemies to pursue." — Prima Games A Link Between Worlds Strategy Guide, pg. 122
- ↑ "Use the Tornado Rod to cool off Heedles, then strike quickly before they reignite." — Prima Games A Link Between Worlds Strategy Guide, pg. 122
- ↑ "Use the Tornado Rod to cool these fiery beasts, then attack them with the sword or other weaponry." — Prima Games A Link Between Worlds Strategy Guide, pg. 122